쿠버네티스를 Hyper-V를 사용해서 install 하고
1개의 master 그리고 2개의 node를 구성하는 환경을 만들어 보고자 한다.
여기에서 Desktop 환경은 불필요 해서 Server live를 선택 하였다.
Hyper-V를 윈도우에서 enable하고 가상컴퓨터를 만들어 보자.
라고 하고 싶은데, 시간이 많이 걸리꺼 같아서 이부분은 google을 통해서 setup 완료 했다고 생각하고 진행 하겠다.
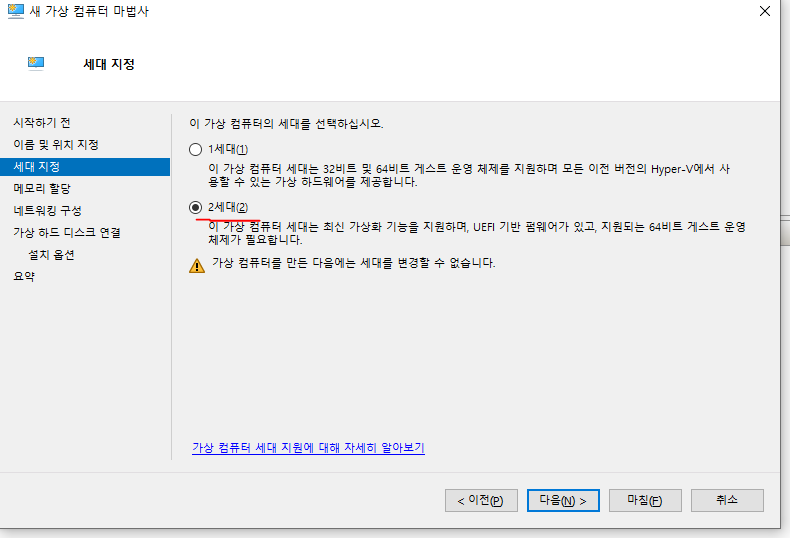
가상 컴퓨터 만들기


메모리는 2기가 이상이 무조건 있어야 한다.
기본 spec 범위이다. 더 필요 하면 나중에 추가 할 수 있다.

default를 연결함으로써 인터넷을 바로 사용하게 하자

용량이 많이 필요 하지 않음으로 20G


3개의 가상컴퓨터를 만들어 주자.
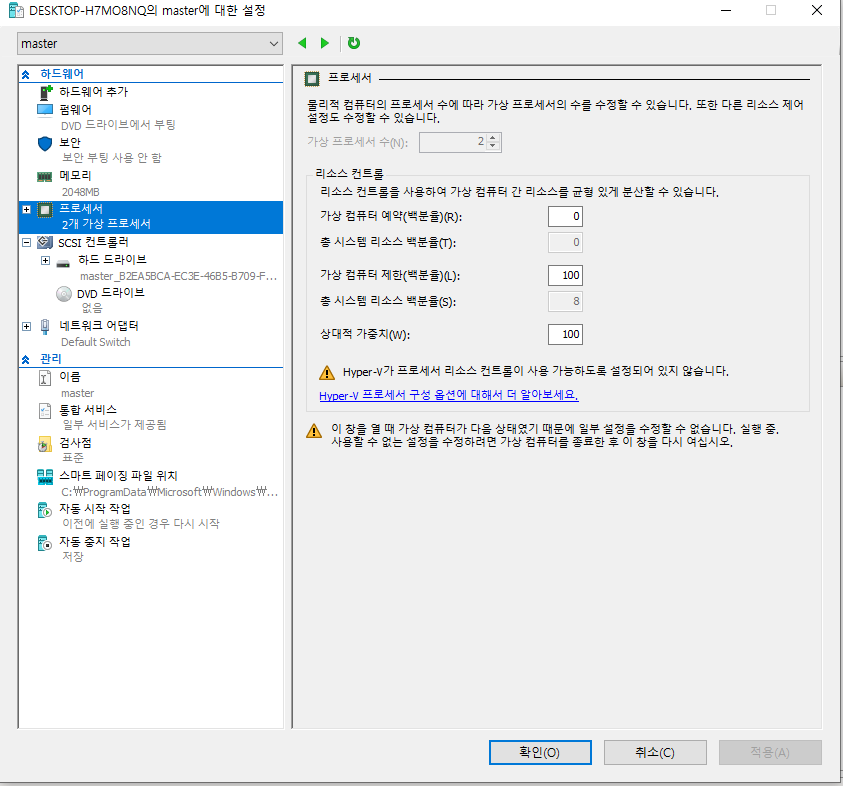
가상 컴퓨터를 시작하기 전에 다음과 같이 설정을 꼭 해줘야 한다.
- 보안 부팅 사용을 Disable : Hyper-V에서 공식으로 인증한 Version이 아니면 작동이 안된다. Disable 해야한다.

- 프로세스는 2개 이상이 반듯이 필요하다

이렇게 하고 컴퓨터를 실행 하면 아래와 같이 install 화면이 나온다.
대부분 default를 선택하고 Done을 하면 된다.

3개의 가상컴퓨터 IP대역이 가급적이면 같은 대역으로 연결되게 만들자.

SSH 서버를 기본적으로 설정해 주자.

마지막으로 snap으로 패키지 인스톨 할거냐고 물어보는데 하지말자.
docker나 microk8s나 교육목적으로 쓰기에는 일반적이지 않다.
Snaps의 경우는 개발 목적이 모든 리눅스에서 사용가능한 패키지 관리자인 관계로
systemd에 service 등록을 지원하지 않는다.
apt로 나중에 인스톨 할 예정이다.

Docker 설치하기
이제 재부팅 하고 돌아와서
로그인 해준다.
가장 먼저 해줘야 할것은
sudo apt update
sudo apt install docker.io
로 docker를 등록해 준다.
ubuntu@master:~$ sudo systemctl status docker
[sudo] password for ubuntu:
● docker.service - Docker Application Container Engine
     Loaded: loaded (/lib/systemd/system/docker.service; enabled; vendor preset: enabled)
     Active: inactive (dead)
TriggeredBy: ● docker.socket
       Docs: https://docs.docker.com
ubuntu@master:~$ ^C
docker가 active로 표시되면 된다.
재부팅에도 작동 가능하도록
sudo systemctl enable docker해주자.
혹시 ubunt 나 cent os의 버전이 하기를 만족시킨 다면 추가적으로 다음 명령어를 진행하자. (ubuntu 20.04.3 LTS는 하기 명령어를 실행 해야 한다.)
Note: overlay2 is the preferred storage driver for systems running Linux kernel version 4.0 or higher, or RHEL or CentOS using version 3.10.0-514 and above.https://kubernetes.io/docs/setup/production-environment/container-runtimes/#docker

docker에 상기 명령어를 추가적으로 진행해 줘야 한다.
sudo mkdir /etc/docker
cat <<EOF | sudo tee /etc/docker/daemon.json
{
  "exec-opts": ["native.cgroupdriver=systemd"],
  "log-driver": "json-file",
  "log-opts": {
    "max-size": "100m"
  },
  "storage-driver": "overlay2"
}
EOF
sudo systemctl enable docker
sudo systemctl daemon-reload
sudo systemctl restart docker만약에 위의 행위를 하지 않는다면
[kubelet-check] It seems like the kubelet isn't running or healthy.
[kubelet-check] The HTTP call equal to 'curl -sSL http://localhost:10248/healthz' failed with error: Get "http://localhost:10248/healthz": dial tcp [::1]:10248: connect: connection refused.
[kubelet-check] It seems like the kubelet isn't running or healthy.
[kubelet-check] The HTTP call equal to 'curl -sSL http://localhost:10248/healthz' failed with error: Get "http://localhost:10248/healthz": dial tcp [::1]:10248: connect: connection refused.
[kubelet-check] It seems like the kubelet isn't running or healthy.
[kubelet-check] The HTTP call equal to 'curl -sSL http://localhost:10248/healthz' failed with error: Get "http://localhost:10248/healthz": dial tcp [::1]:10248: connect: connection refused.
[kubelet-check] It seems like the kubelet isn't running or healthy.
[kubelet-check] The HTTP call equal to 'curl -sSL http://localhost:10248/healthz' failed with error: Get "http://localhost:10248/healthz": dial tcp [::1]:10248: connect: connection refused.
[kubelet-check] It seems like the kubelet isn't running or healthy.
[kubelet-check] The HTTP call equal to 'curl -sSL http://localhost:10248/healthz' failed with error: Get "http://localhost:10248/healthz": dial tcp [::1]:10248: connect: connection refused.
위와 같은 오류가 발생한다.
Kubernetes admin master install
kubernetes.io/docs/setup/production-environment/tools/kubeadm/install-kubeadm/
여기 문서를 기반으로 Master 환경을 만들어 보자.
- Master Node에만 Install 해야 한다
cat <<EOF | sudo tee /etc/modules-load.d/k8s.conf
br_netfilter
EOF

cat <<EOF | sudo tee /etc/sysctl.d/k8s.conf
net.bridge.bridge-nf-call-ip6tables = 1
net.bridge.bridge-nf-call-iptables = 1
EOF
sudo sysctl --system
실행 했을 때 화면
ubuntu@master:~$ cat <<EOF | sudo tee /etc/modules-load.d/k8s.conf
> br_netfilter
> EOF
br_netfilter
ubuntu@master:~$
ubuntu@master:~$ cat <<EOF | sudo tee /etc/sysctl.d/k8s.conf
> net.bridge.bridge-nf-call-ip6tables = 1
> net.bridge.bridge-nf-call-iptables = 1
> EOF
net.bridge.bridge-nf-call-ip6tables = 1
net.bridge.bridge-nf-call-iptables = 1
ubuntu@master:~$ sudo sysctl --system
k8s.conf에 network 설정이 처리 되면 된다.
Inbound Ports를 모두 Open이 필요하다.
ProtocolDirectionPort RangePurposeUsed By
| TCP | Inbound | 6443* | Kubernetes API server | All |
| TCP | Inbound | 2379-2380 | etcd server client API | kube-apiserver, etcd |
| TCP | Inbound | 10250 | kubelet API | Self, Control plane |
| TCP | Inbound | 10251 | kube-scheduler | Self |
| TCP | Inbound | 10252 | kube-controller-manager | Self |
하지만 귀찮으니까 방화벽을 disable 시키자.
ubuntu@master:~$ sudo systemctl stop ufw.service
ubuntu@master:~$ sudo systemctl disable ufw.service
Synchronizing state of ufw.service with SysV service script with /lib/systemd/systemd-sysv-install.
Executing: /lib/systemd/systemd-sysv-install disable ufw
Removed /etc/systemd/system/multi-user.target.wants/ufw.service.
ubuntu@master:~$ sudo ufw status
Status: inactive
ubuntu@master:~$
참고로 ufw는 기본적으로 disable 상태이다. service를 삭제 하지 않아도 문제는 없다.
sudo apt-get update && sudo apt-get install -y apt-transport-https curl
curl -s https://packages.cloud.google.com/apt/doc/apt-key.gpg | sudo apt-key add -
cat <<EOF | sudo tee /etc/apt/sources.list.d/kubernetes.list
deb https://apt.kubernetes.io/ kubernetes-xenial main
EOF
sudo apt-get update
sudo apt-get install -y kubelet kubeadm kubectl
sudo apt-mark hold kubelet kubeadm kubectl
명령어를 master에서 순차적으로 실행 시켜주자.
install이 완료 되었다면 master에서만
sudo kubeadm init을 실행 시켜 주자.
혹시 swap 오류가 난다면 swap을 정지 시켜 주자.
ubuntu@master:~$ sudo kubeadm init
[init] Using Kubernetes version: v1.20.4
[preflight] Running pre-flight checks
	[WARNING IsDockerSystemdCheck]: detected "cgroupfs" as the Docker cgroup driver. The recommended driver is "systemd". Please follow the guide at https://kubernetes.io/docs/setup/cri/
error execution phase preflight: [preflight] Some fatal errors occurred:
	[ERROR Swap]: running with swap on is not supported. Please disable swap
[preflight] If you know what you are doing, you can make a check non-fatal with `--ignore-preflight-errors=...`
To see the stack trace of this error execute with --v=5 or higher
ubuntu@master:~$ sudo swapoff -a
재 부팅시 swap option이 다시 enable되어서 k8s의 네트워크가 다시 활성화 되지 못하는 경우가 있다.
이 경우에는 swap 파티션을 날려줘야 한다.
etc/fstab 으로 이동해서
# /etc/fstab: static file system information.
#
# Use 'blkid' to print the universally unique identifier for a
# device; this may be used with UUID= as a more robust way to name devices
# that works even if disks are added and removed. See fstab(5).
#
# <file system> <mount point>   <type>  <options>       <dump>  <pass>
# / was on /dev/ubuntu-vg/ubuntu-lv during curtin installation
/dev/disk/by-id/dm-uuid-LVM-ReTHDzvQRocsvEInnWXuU7lHf1CGldDNS10sxd8zFLiLj0Qv4N1z3BLgHyDtP3nA / ext4 defaults 0 0
# /boot was on /dev/sda2 during curtin installation
/dev/disk/by-uuid/0e7f2afd-8948-4c5c-9aab-4526a50403ae /boot ext4 defaults 0 0
# /boot/efi was on /dev/sda1 during curtin installation
/dev/disk/by-uuid/8808-A9C0 /boot/efi vfat defaults 0 0
#/swap.img      none    swap    sw      0       0
swap.img 앞에 커멘트를 해주자.
init이 완료 되면 아래와 같이 클러스터가 만들어진 것을 확인 할 수 있다.
Your Kubernetes control-plane has initialized successfully!

To start using your cluster, you need to run the following as a regular user:

  mkdir -p $HOME/.kube
  sudo cp -i /etc/kubernetes/admin.conf $HOME/.kube/config
  sudo chown $(id -u):$(id -g) $HOME/.kube/config

Alternatively, if you are the root user, you can run:

  export KUBECONFIG=/etc/kubernetes/admin.conf

You should now deploy a pod network to the cluster.
Run "kubectl apply -f [podnetwork].yaml" with one of the options listed at:
  https://kubernetes.io/docs/concepts/cluster-administration/addons/

Then you can join any number of worker nodes by running the following on each as root:

kubeadm join 192.168.241.92:6443 --token q8xz88.tyi8iwycpbgiw75q \
    --discovery-token-ca-cert-hash sha256:62e016db49d0764822e040813a32992cd7f1a1e4e5e22e64c00b51f3fcba6e8c
kubelet을 재부팅시에도 실행 할 수 있게 enable 시켜준다. swap와 kublet 설정은 nodes도 동일하게 한다.
ubuntu@master:~$ sudo systemctl enable kubelet
ubuntu@master:~$ sudo systemctl status kubelet
● kubelet.service - kubelet: The Kubernetes Node Agent
     Loaded: loaded (/lib/systemd/system/kubelet.service; enabled; vendor preset: enabled)
    Drop-In: /etc/systemd/system/kubelet.service.d
             └─10-kubeadm.conf
     Active: active (running) since Sat 2021-03-06 15:21:48 UTC; 7min ago
       Docs: https://kubernetes.io/docs/home/
   Main PID: 4176 (kubelet)
      Tasks: 15 (limit: 2194)
     Memory: 43.7M
     CGroup: /system.slice/kubelet.service
             └─4176 /usr/bin/kubelet --bootstrap-kubeconfig=/etc/kubernetes/bootstrap-kubelet.conf --kubeconfig=/etc/kubernetes/kubelet.conf --config=/var/lib/kubelet/config.yaml --network-plugin=cni --pod-infra-container-image=k8s.gcr.io/p>

Mar 06 15:29:16 master kubelet[4176]: E0306 15:29:16.760091    4176 remote_runtime.go:143] StopPodSandbox "00043a9acb8128c26175e16867e5b92101b64e38e06f60513510a09d23392423" from runtime service failed: rpc error: code = Unknown desc = netwo>
Mar 06 15:29:16 master kubelet[4176]: E0306 15:29:16.760127    4176 kuberuntime_manager.go:923] Failed to stop sandbox {"docker" "00043a9acb8128c26175e16867e5b92101b64e38e06f60513510a09d23392423"}
Mar 06 15:29:16 master kubelet[4176]: E0306 15:29:16.760155    4176 kuberuntime_manager.go:702] killPodWithSyncResult failed: failed to "KillPodSandbox" for "432c58dd-d4a5-4ffa-b8ae-5551b1dbcb1f" with KillPodSandboxError: "rpc error: code =>
Mar 06 15:29:16 master kubelet[4176]: E0306 15:29:16.760170    4176 pod_workers.go:191] Error syncing pod 432c58dd-d4a5-4ffa-b8ae-5551b1dbcb1f ("coredns-74ff55c5b-kmr8s_kube-system(432c58dd-d4a5-4ffa-b8ae-5551b1dbcb1f)"), skipping: failed t>
Mar 06 15:29:27 master kubelet[4176]: W0306 15:29:27.742432    4176 cni.go:333] CNI failed to retrieve network namespace path: cannot find network namespace for the terminated container "51ad81be6b5e89e6b4c34961a08613c4018bd99dedd08beab46ba>
Mar 06 15:29:27 master kubelet[4176]: E0306 15:29:27.757127    4176 cni.go:387] Error deleting kube-system_coredns-74ff55c5b-qxkdh/51ad81be6b5e89e6b4c34961a08613c4018bd99dedd08beab46baa5b8a1c453a from network weave-net/weave: Delete "http:/>
Mar 06 15:29:27 master kubelet[4176]: E0306 15:29:27.757793    4176 remote_runtime.go:143] StopPodSandbox "51ad81be6b5e89e6b4c34961a08613c4018bd99dedd08beab46baa5b8a1c453a" from runtime service failed: rpc error: code = Unknown desc = netwo>
Mar 06 15:29:27 master kubelet[4176]: E0306 15:29:27.757828    4176 kuberuntime_manager.go:923] Failed to stop sandbox {"docker" "51ad81be6b5e89e6b4c34961a08613c4018bd99dedd08beab46baa5b8a1c453a"}
Mar 06 15:29:27 master kubelet[4176]: E0306 15:29:27.757854    4176 kuberuntime_manager.go:702] killPodWithSyncResult failed: failed to "KillPodSandbox" for "5755ef7f-fb7d-4f86-b726-49ce9675e197" with KillPodSandboxError: "rpc error: code =>
Mar 06 15:29:27 master kubelet[4176]: E0306 15:29:27.757868    4176 pod_workers.go:191] Error syncing pod 5755ef7f-fb7d-4f86-b726-49ce9675e197 ("coredns-74ff55c5b-qxkdh_kube-system(5755ef7f-fb7d-4f86-b726-49ce9675e197)"), skipping: failed t>
lines 1-22/22 (END)
Kubernetes node install
master 노드에서 다음 명령어를 실행해 보자.
- sudo kubectl get pods
만약 다음과 같은
The connection to the server localhost:8080 was refused - did you specify the right host or port
내용이 나온다면
- sudo kubectl config view
를 실행해 보자
apiVersion: v1
clusters: null
contexts: null
current-context: ""
kind: Config
preferences: {}
users: null
context가 등록 되지 않아서 나는 문제이다.
다음과 같이 현재 user에서 context를 설정해 주자
  mkdir -p $HOME/.kube
  sudo cp -i /etc/kubernetes/admin.conf $HOME/.kube/config
  sudo chown $(id -u):$(id -g) $HOME/.kube/config
그리고 다시 context를 확인해 보면 아래와 같이 정상 작동 하는 것을 볼 수 있다.
ubuntu@master:~$ kubectl config view
apiVersion: v1
clusters:
- cluster:
    certificate-authority-data: DATA+OMITTED
    server: https://192.168.241.92:6443
  name: kubernetes
contexts:
- context:
    cluster: kubernetes
    user: kubernetes-admin
  name: kubernetes-admin@kubernetes
current-context: kubernetes-admin@kubernetes
kind: Config
preferences: {}
users:
- name: kubernetes-admin
  user:
    client-certificate-data: REDACTED
    client-key-data: REDACTED
ubuntu@master:~$ kubectl get pods
No resources found in default namespace.
node1과 node2에 kubelet과 kubectl을 설치해 준다.
join을 위해서 kubeadm도 설치 하는데 절대로 init을 해서는 안된다.
sudo apt update
sudo apt install docker.io
sudo mkdir /etc/docker
cat <<EOF | sudo tee /etc/docker/daemon.json
{
"exec-opts": ["native.cgroupdriver=systemd"],
"log-driver": "json-file",
"log-opts": {
"max-size": "100m"
},
"storage-driver": "overlay2"
}
EOFsudo systemctl enable docker
sudo systemctl daemon-reload
sudo systemctl restart dockersudo apt-get update && sudo apt-get install -y apt-transport-https curl
curl -s https://packages.cloud.google.com/apt/doc/apt-key.gpg | sudo apt-key add -
cat <<EOF | sudo tee /etc/apt/sources.list.d/kubernetes.list
deb https://apt.kubernetes.io/ kubernetes-xenial main
EOF
sudo apt-get update
sudo apt-get install -y kubelet kubeadm kubectl
sudo apt-mark hold kubelet kubeadm kubectl
kubernetes docker network install
Container network Interface 가 설치되지 않으면 docker 내 container간 연동이 안된다.
www.weave.works/docs/net/latest/kubernetes/kube-addon/
weave를 사용해서 설치하도록 하겠다.
Master에서만 처리하면 된다.
ubuntu@master:~$ kubectl apply -f "https://cloud.weave.works/k8s/net?k8s-version=$(kubectl version | base64 | tr -d '\n')"
serviceaccount/weave-net created
clusterrole.rbac.authorization.k8s.io/weave-net created
clusterrolebinding.rbac.authorization.k8s.io/weave-net created
role.rbac.authorization.k8s.io/weave-net created
rolebinding.rbac.authorization.k8s.io/weave-net created
daemonset.apps/weave-net created
상기처럼 잘 만들어졌다면 위에서 나온 값을 사용해서 node1과 node2에서 연결해 보자.
- kubeadm join 192.168.241.92:6443 --token q8xz88.tyi8iwycpbgiw75q \
--discovery-token-ca-cert-hash sha256:62e016db49d0764822e040813a32992cd7f1a1e4e5e22e64c00b51f3fcba6e8c
ubuntu@node:~$ sudo kubeadm join 192.168.241.92:6443 --token q8xz88.tyi8iwycpbgiw75q --discovery-token-ca-cert-hash sha256:62e016db49d0764822e040813a32992cd7f1a1e4e5e22e64c00b51f3fcba6e8c
[preflight] Running pre-flight checks
	[WARNING IsDockerSystemdCheck]: detected "cgroupfs" as the Docker cgroup driver. The recommended driver is "systemd". Please follow the guide at https://kubernetes.io/docs/setup/cri/
[preflight] Reading configuration from the cluster...
[preflight] FYI: You can look at this config file with 'kubectl -n kube-system get cm kubeadm-config -o yaml'
[kubelet-start] Writing kubelet configuration to file "/var/lib/kubelet/config.yaml"
[kubelet-start] Writing kubelet environment file with flags to file "/var/lib/kubelet/kubeadm-flags.env"
[kubelet-start] Starting the kubelet
[kubelet-start] Waiting for the kubelet to perform the TLS Bootstrap...

This node has joined the cluster:
* Certificate signing request was sent to apiserver and a response was received.
* The Kubelet was informed of the new secure connection details.

Run 'kubectl get nodes' on the control-plane to see this node join the cluster.
이렇게 나온다면 마스터와 노드가 연결된 것이다.
아주 만약에 ... Hash같은게 오류가 나온다면 다음 명령어로 내용을 확인해 보면 된다.
ubuntu@master:~$ sudo kubeadm token list
TOKEN                     TTL         EXPIRES                USAGES                   DESCRIPTION                                                EXTRA GROUPS
q8xz88.tyi8iwycpbgiw75q   22h         2021-03-05T14:04:22Z   authentication,signing   The default bootstrap token generated by 'kubeadm init'.   system:bootstrappers:kubeadm:default-node-token
여기서 토큰과
ubuntu@master:~$ openssl x509 -pubkey -in /etc/kubernetes/pki/ca.crt | openssl rsa -pubin -outform der 2>/dev/null | openssl dgst -sha256 -hex | sed 's/^.* //'
62e016db49d0764822e040813a32992cd7f1a1e4e5e22e64c00b51f3fcba6e8c
여기서 hash값이 join에서 사용되는 파라메터 이다.
sudo kubeadm join 192.168.241.92:6443 --token <<토큰값>> --discovery-token-ca-cert-hash sha256:<<해쉬값>>
Master에서 최종적으로
ubuntu@master:~$ kubectl get nodes
NAME     STATUS   ROLES                  AGE     VERSION
master   Ready    control-plane,master   66m     v1.20.4
node     Ready    <none>                 2m32s   v1.20.4
node2    Ready    <none>                 109s    v1.20.4
ubuntu@master:~$ kubectl get pods --all-namespaces
NAMESPACE     NAME                             READY   STATUS    RESTARTS   AGE
kube-system   coredns-74ff55c5b-qtzk4          1/1     Running   0          73m
kube-system   coredns-74ff55c5b-sskwr          1/1     Running   0          73m
kube-system   etcd-master                      1/1     Running   0          73m
kube-system   kube-apiserver-master            1/1     Running   0          73m
kube-system   kube-controller-manager-master   1/1     Running   0          73m
kube-system   kube-proxy-c62ml                 1/1     Running   0          8m33s
kube-system   kube-proxy-gj656                 1/1     Running   0          73m
kube-system   kube-proxy-wz7np                 1/1     Running   0          9m16s
kube-system   kube-scheduler-master            1/1     Running   0          73m
kube-system   weave-net-4lv67                  2/2     Running   1          17m
kube-system   weave-net-clh88                  2/2     Running   1          9m16s
kube-system   weave-net-x8w69                  2/2     Running   0          8m33s
상기와 같이 Ready 상태가 된다면 드디어 k8s를 시작할 수있는 환경이 된것이다.
Tip
hyper V의 인스턴스를 재기동 하면 DHCP 사용시 ip가 변경된다.
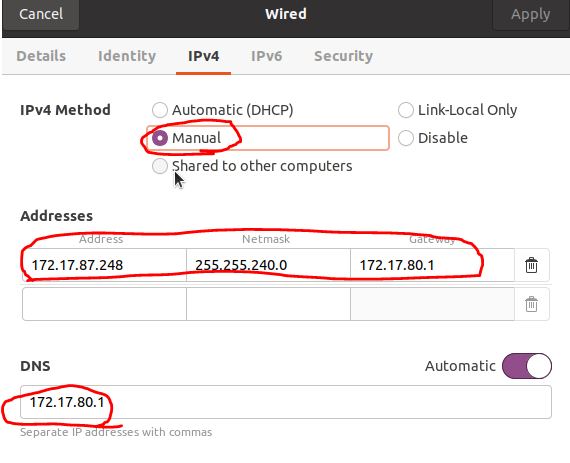
그래서 설치할때는 DHCP를 사용하더라도 고정 ip로 변경해 주자.
고정 ip는 DHCP로 배정 받은 ip를 기준으로 설정 하면 된다.


Gateway는
hyper V를 실행한 컴퓨터에서 ipconfg를 사용해서 vEthernet을 찾으면 된다.
해당 값이 Gateway이자 DNS가 된다.

만약에 ip가 변경되었다면 앞서 설정해 놓은 kubernetes 설정은 모두 쓸모 없어진다.
모두
sudo kubeadm reset
을 이용해서 초기화 시켜주고 다시 init 시켜주는 행위를 해야한다.
참고로 reset command는 join을 하는 node도 reset을 한다.
'Software활용' 카테고리의 다른 글
| Ubuntu에 Python 3.7 Install 하기 (0) | 2021.03.07 |
|---|---|
| kubernetes reset 하기 (0) | 2021.03.07 |
| Kubernetes Deployments No resources (0) | 2021.03.01 |
| ssh key를 이용한 github 접근 (0) | 2021.03.01 |
| Git branch 분리하기 (0) | 2021.03.01 |
