guestbook 을 local에 다운로드
v1-18.docs.kubernetes.io/docs/tutorials/stateless-application/guestbook/
git clone origin https://github.com/theyoung/guestbook.git
guestbook의 php lint 확인
curl -sL https://deb.nodesource.com/setup_12.x | sudo -E bash -
sudo apt install nodejs
sudo npm i -g phplint
phplint "php-redis/*.php"
No syntax errors detected in php-redis/guestbook.php
docker image build
cd php-redis
docker build --tag stevenna/guestbook .
docker run -d -p 8000:80 stevenna/guestbook --name guestbook
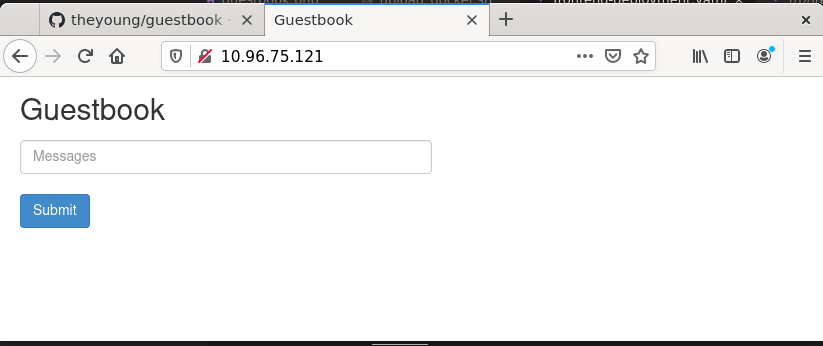
서비스 작동 확인
curl localhost:8000
docker 삭제
docker stop guestbook
docker system prune -f
Redis Master Deploy
서비스 자체를 실행하는 목적
cd ..
kubectl apply -f redis-master-deployment.yaml
kubectl get pods
외부와 통신하기 위해서
kubectl apply -f redis-master-service.yaml
포트가 정상적으로 작동하는 것을 확인 할 수 있다.
Redis Slave Deploy
kubectl apply -f redis-slave-deployment.yaml
kubectl apply -f redis-slave-service.yaml

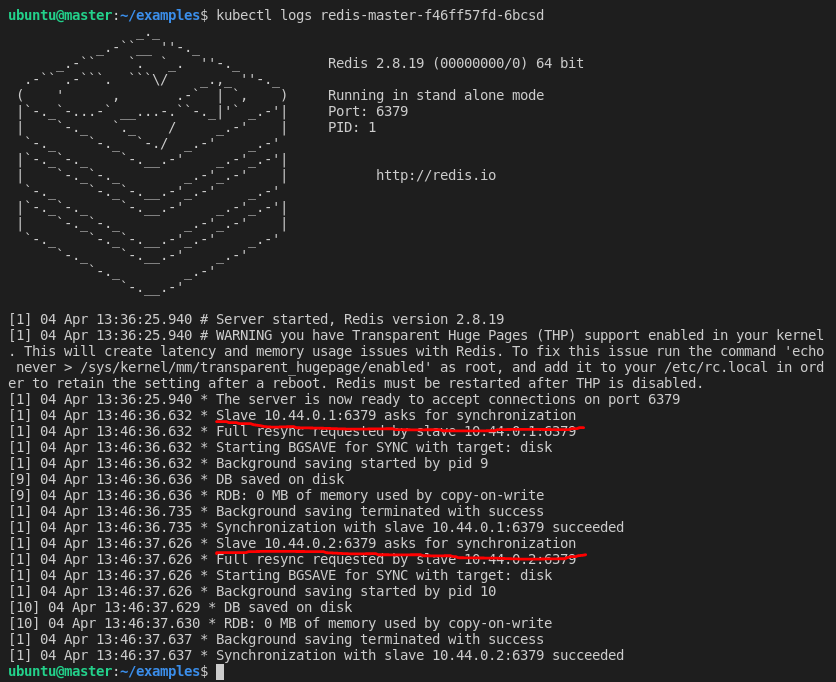
master에 slave가 연결된 것을 확일 할 수 있다.
Docker file upload하기
#!/usr/bin/env bash
# This file tags and uploads an image to Docker Hub

# Assumes that an image is built via `run_docker.sh`

# Step 1:
# Create dockerpath
# dockerpath=<your docker ID/path>
dockerpath="stevenna/guestbook"
# Step 2:
# Authenticate & tag
echo "Docker ID and Image: $dockerpath"
docker login
docker tag stevenna/guestbook:latest $dockerpath:latest

# Step 3:
# Push image to a docker repository
docker push $dockerpath:latest
ubuntu@master:~/examples/php-redis$ chmod +x upload_docker.sh
ubuntu@master:~/examples/php-redis$ ./upload_docker.sh 
frontend 서비스 실행 하기
kubectl apply -f frontend-deployment.yaml
kubectl apply -f frontend-service.yaml


Service의 특정 정보 capture하기
kubectl describe service frontendfrontend라고 하는 서비스 정보를 모두 얻어옮
Name:                     frontend
Namespace:                default
Labels:                   app=guestbook
                          tier=frontend
Annotations:              <none>
Selector:                 app=guestbook,tier=frontend
Type:                     NodePort
IP Families:              <none>
IP:                       10.96.75.121
IPs:                      10.96.75.121
Port:                     <unset>  80/TCP
TargetPort:               80/TCP
NodePort:                 <unset>  30605/TCP
Endpoints:                10.36.0.2:80,10.36.0.3:80,10.44.0.3:80
Session Affinity:         None
External Traffic Policy:  Cluster
Events:                   <none>
app= 으로 시작하고 ,로 끝나는 영역의 값을 얻어오기
ubuntu@master:~/examples$ kubectl describe service frontend | egrep -o 'app=(.*?),'
app=guestbook,
Deployment 수정하기
frontend deployment.yaml에 CI/CD를 이용한 blue green을 설정 하기 위하여 컬러 정보인 selector를 추가하고자 한다.
apiVersion: apps/v1 #  for k8s versions before 1.9.0 use apps/v1beta2  and before 1.8.0 use extensions/v1beta1
kind: Deployment
metadata:
  name: frontend
spec:
  selector:
    matchLabels:
      app: guestbook
      tier: frontend
      color: blue
  replicas: 3
  template:
    metadata:
      labels:
        app: guestbook
        tier: frontend
        color: blue
    spec:
      containers:
      - name: php-redis
        image: stevenna/guestbook:latest
        resources:
          requests:
            cpu: 100m
            memory: 100Mi
        env:
        - name: GET_HOSTS_FROM
          value: dns
          # If your cluster config does not include a dns service, then to
          # instead access environment variables to find service host
          # info, comment out the 'value: dns' line above, and uncomment the
          # line below:
          # value: env
        ports:
        - containerPort: 80
상위에서 `color: blue` 이 부분을 selector와 metadata labes에 추가 했다.
ubuntu@master:~/examples$ kubectl apply -f frontend-deployment.yaml
The Deployment "frontend" is invalid: spec.selector: Invalid value: v1.LabelSelector{MatchLabels:map[string]string{"app":"guestbook", "color":"blue", "tier":"frontend"}, MatchExpressions:[]v1.LabelSelectorRequirement(nil)}: field is immutable
ubuntu@master:~/examples$ kubectl replace -f frontend-deployment.yaml
The Deployment "frontend" is invalid: spec.selector: Invalid value: v1.LabelSelector{MatchLabels:map[string]string{"app":"guestbook", "color":"blue", "tier":"frontend"}, MatchExpressions:[]v1.LabelSelectorRequirement(nil)}: field is immutable
그러나 deployment에서 상기 부분에 대한 수정은 막혀있다.
그래서 다음과 같이 강제로 설정 파일을 수정해 주겠다.
ubuntu@master:~/examples$ kubectl replace -f frontend-deployment.yaml --force
deployment.apps "frontend" deleted
deployment.apps/frontend replaced
ubuntu@master:~/examples$ kubectl get deployment
NAME READY UP-TO-DATE AVAILABLE AGE
frontend 3/3 3 3 15s
redis-master 1/1 1 1 12d
redis-slave 2/2 2 2 12d
ubuntu@master:~/examples$ kubectl describe deployment frontend
Name: frontend
Namespace: default
CreationTimestamp: Sat, 17 Apr 2021 04:25:07 +0000
Labels: <none>
Annotations: deployment.kubernetes.io/revision: 1
Selector: app=guestbook,color=blue,tier=frontend
Replicas: 3 desired | 3 updated | 3 total | 3 available | 0 unavailable
StrategyType: RollingUpdate
MinReadySeconds: 0
RollingUpdateStrategy: 25% max unavailable, 25% max surge
Pod Template:
Labels: app=guestbook
color=blue
tier=frontend
Containers:
php-redis:
Image: stevenna/guestbook:latest
Port: 80/TCP
Host Port: 0/TCP
Requests:
cpu: 100m
memory: 100Mi
Environment:
GET_HOSTS_FROM: dns
Mounts: <none>
Volumes: <none>
Conditions:
Type Status Reason
---- ------ ------
Available True MinimumReplicasAvailable
Progressing True NewReplicaSetAvailable
OldReplicaSets: <none>
NewReplicaSet: frontend-5b4c8f8c97 (3/3 replicas created)
Events:
Type Reason Age From Message
---- ------ ---- ---- -------
Normal ScalingReplicaSet 41s deployment-controller Scaled up replica set frontend-5b4c8f8c97 to 3상기 describe된 내용을 보면 selector에 color가 적용 된것을 확인 할 수 있다.
추가적으로 해당 deployment로 지정된 Pod에 Label이 잘 지정되었는지 확인이 필요하다.
ubuntu@master:~/examples$ kubectl get pod --show-labels
NAME                           READY   STATUS    RESTARTS   AGE   LABELS
frontend-5b4c8f8c97-gncpf      1/1     Running   0          36m   app=guestbook,color=blue,pod-template-hash=5b4c8f8c97,tier=frontend
frontend-5b4c8f8c97-plssf      1/1     Running   0          36m   app=guestbook,color=blue,pod-template-hash=5b4c8f8c97,tier=frontend
frontend-5b4c8f8c97-zd6kw      1/1     Running   0          36m   app=guestbook,color=blue,pod-template-hash=5b4c8f8c97,tier=frontend
redis-master-f46ff57fd-6bcsd   1/1     Running   0          12d   app=redis,pod-template-hash=f46ff57fd,role=master,tier=backend
redis-slave-7979cfdfb8-kmljf   1/1     Running   0          12d   app=redis,pod-template-hash=7979cfdfb8,role=slave,tier=backend
redis-slave-7979cfdfb8-r626l   1/1     Running   0          12d   app=redis,pod-template-hash=7979cfdfb8,role=slave,tier=backend
Label이 지정된것을 확인 가능하다면, 다음과 같이 특정 Pod만 조회 할 수도 있다.
ubuntu@master:~/examples$ kubectl get pod --selector "color=blue"
NAME                        READY   STATUS    RESTARTS   AGE
frontend-5b4c8f8c97-gncpf   1/1     Running   0          37m
frontend-5b4c8f8c97-plssf   1/1     Running   0          37m
frontend-5b4c8f8c97-zd6kw   1/1     Running   0          37m
이런 Label 지정은 blue green을 만들어 내는데 필수 적인 요소가 된다.
하기 label관련해서 잘 설명된 사이트를 참고 바란다.
downey.io/notes/dev/kubernetes-labels-are-case-sensitive/
Service 수정하기
Service는 Deployments를 대표하는 Exposure Adapter역할을 하게 된다. front라는 서비스가 blue를 select할 수 있도록 업데이트 해주고자 한다.
apiVersion: v1
kind: Service
metadata:
  name: frontend
  labels:
    app: guestbook
    tier: frontend
spec:
  # comment or delete the following line if you want to use a LoadBalancer
  type: NodePort
  # if your cluster supports it, uncomment the following to automatically create
  # an external load-balanced IP for the frontend service.
  # type: LoadBalancer
  ports:
  - port: 80
  selector:
    app: guestbook
    tier: frontend
    color: blue
frontend-service.yaml에서 selector에 `color: blue`를 추가 하였다.
service는 patch 명령어를 통해서 service 정보를 업데이트 가능하다.
ubuntu@master:~/examples$ kubectl patch service frontend --patch-file frontend-service.yaml
service/frontend patched
ubuntu@master:~/examples$ kubectl describe service frontend
Name:                     frontend
Namespace:                default
Labels:                   app=guestbook
                          tier=frontend
Annotations:              <none>
Selector:                 app=guestbook,color=blue,tier=frontend
Type:                     NodePort
IP Families:              <none>
IP:                       10.96.75.121
IPs:                      10.96.75.121
Port:                     <unset>  80/TCP
TargetPort:               80/TCP
NodePort:                 <unset>  30605/TCP
Endpoints:                10.36.0.4:80,10.36.0.5:80,10.44.0.4:80
Session Affinity:         None
External Traffic Policy:  Cluster
Events:                   <none>
selector에 blue가 들어 간 것을 확인 할 수 있다.
Green Deployments 만들기
php-redis 디렉토리에 있는 index.html에 title을 살짝 수정한다
<html ng-app="redis">
  <head>
    <title>Guestbook</title>
    <link rel="stylesheet" href="//netdna.bootstrapcdn.com/bootstrap/3.1.1/css/bootstrap.min.css">
    <script src="https://ajax.googleapis.com/ajax/libs/angularjs/1.2.12/angular.min.js"></script>
    <script src="controllers.js"></script>
    <script src="https://cdnjs.cloudflare.com/ajax/libs/angular-ui-bootstrap/0.13.0/ui-bootstrap-tpls.js"></script>
  </head>
  <body ng-controller="RedisCtrl">
    <div style="width: 50%; margin-left: 20px">
      <h2>Guestbook v2</h2>
    <form>
    <fieldset>
    <input ng-model="msg" placeholder="Messages" class="form-control" type="text" name="input"><br>
    <button type="button" class="btn btn-primary" ng-click="controller.onRedis()">Submit</button>
    </fieldset>
    </form>
    <div>
      <div ng-repeat="msg in messages track by $index">
        {{msg}}
      </div>
    </div>
    </div>
  </body>
</html>
Guestbook v2로 h2의 이름을 변경하였다.
이를 docker image화 하고 docker hub에 업로드 하였다.
이제 Green pod를 만들기 위해 기존에 있엇던 frontend-deployment를 수정하고자 한다.
apiVersion: apps/v1 #  for k8s versions before 1.9.0 use apps/v1beta2  and before 1.8.0 use extensions/v1beta1
kind: Deployment
metadata:
  name: frontend-green
  labels:
    color: green

spec:
  selector:
    matchLabels:
      app: guestbook
      tier: frontend
      color: green
  replicas: 3
  template:
    metadata:
      labels:
        app: guestbook
        tier: frontend
        color: green
    spec:
      containers:
      - name: php-redis
        image: stevenna/guestbook:latest
        resources:
          requests:
            cpu: 100m
            memory: 100Mi
        env:
        - name: GET_HOSTS_FROM
          value: dns
          # If your cluster config does not include a dns service, then to
          # instead access environment variables to find service host
          # info, comment out the 'value: dns' line above, and uncomment the
          # line below:
          # value: env
        ports:
        - containerPort: 80
기존 blue를 green으로 수정하였다.
여기서 주의 할 것은
- name이 변경되어야 한다
- color를 green으로 지정해 줬다.
- metadata에 deployment color green을 지정했다.
ubuntu@master:~/examples$ kubectl apply -f frontend-deployment.yaml
deployment.apps/frontend-green created
위와같이 Green Deployment를 생성하고 Lable을 확인하자
ubuntu@master:~/examples$ kubectl get deployment --show-labels
NAME             READY   UP-TO-DATE   AVAILABLE   AGE   LABELS
frontend         3/3     3            3           69m   <none>
frontend-green   3/3     3            3           27s   color=green
redis-master     1/1     1            1           12d   <none>
redis-slave      2/2     2            2           12d   <none>
상위와 같이 labe을 지정하게 되면 해당 deployments와 pods를 동시 삭제 할 때 유용하다.
ubuntu@master:~/examples$ kubectl get deployment --selector "color=green"
NAME             READY   UP-TO-DATE   AVAILABLE   AGE
frontend-green   3/3     3            3           3m3s
이와같이 selector로 선택 가능한 상태가 된다.
ubuntu@master:~/examples$ kubectl get pods --show-labels
NAME                             READY   STATUS    RESTARTS   AGE     LABELS
frontend-5b4c8f8c97-gncpf        1/1     Running   0          72m     app=guestbook,color=blue,pod-template-hash=5b4c8f8c97,tier=frontend
frontend-5b4c8f8c97-plssf        1/1     Running   0          72m     app=guestbook,color=blue,pod-template-hash=5b4c8f8c97,tier=frontend
frontend-5b4c8f8c97-zd6kw        1/1     Running   0          72m     app=guestbook,color=blue,pod-template-hash=5b4c8f8c97,tier=frontend
frontend-green-cc4cdd48b-8jggn   1/1     Running   0          3m50s   app=guestbook,color=green,pod-template-hash=cc4cdd48b,tier=frontend
frontend-green-cc4cdd48b-bhfzt   1/1     Running   0          3m50s   app=guestbook,color=green,pod-template-hash=cc4cdd48b,tier=frontend
frontend-green-cc4cdd48b-wdctv   1/1     Running   0          3m50s   app=guestbook,color=green,pod-template-hash=cc4cdd48b,tier=frontend
redis-master-f46ff57fd-6bcsd     1/1     Running   0          12d     app=redis,pod-template-hash=f46ff57fd,role=master,tier=backend
redis-slave-7979cfdfb8-kmljf     1/1     Running   0          12d     app=redis,pod-template-hash=7979cfdfb8,role=slave,tier=backend
redis-slave-7979cfdfb8-r626l     1/1     Running   0          12d     app=redis,pod-template-hash=7979cfdfb8,role=slave,tier=backend
파드도 상기와 같이 잘 생성 된것을 확인 하였다. 이제 서비스가 `front-green` deployment를 확인 하도록 수정하면 된다.
Green Service 라우팅하기
apiVersion: v1
kind: Service
metadata:
  name: frontend
  labels:
    app: guestbook
    tier: frontend
spec:
  # comment or delete the following line if you want to use a LoadBalancer
  type: NodePort
  # if your cluster supports it, uncomment the following to automatically create
  # an external load-balanced IP for the frontend service.
  # type: LoadBalancer
  ports:
  - port: 80
  selector:
    app: guestbook
    tier: frontend
    color: green
상기와 같이 selector를 기존 blue에서 green으로 수정하였다.
ubuntu@master:~/examples$ kubectl patch service frontend --patch-file frontend-service.yaml
service/frontend patched
ubuntu@master:~/examples$ kubectl describe service frontend
Name:                     frontend
Namespace:                default
Labels:                   app=guestbook
                          tier=frontend
Annotations:              <none>
Selector:                 app=guestbook,color=green,tier=frontend
Type:                     NodePort
IP Families:              <none>
IP:                       10.96.75.121
IPs:                      10.96.75.121
Port:                     <unset>  80/TCP
TargetPort:               80/TCP
NodePort:                 <unset>  30605/TCP
Endpoints:                10.36.0.2:80,10.44.0.3:80,10.44.0.5:80
Session Affinity:         None
External Traffic Policy:  Cluster
Events:                   <none>
패치 명령어를 통해서 selector를 green으로 수정하였다.

Guestbook v2가 정상적으로 작동하는 것을 확인 하였다.
이제 기존 불필요한 blue를 삭제 해주자
ubuntu@master:~/examples$ kubectl delete deployment frontend
deployment.apps "frontend" deleted
ubuntu@master:~/examples$ kubectl get deployment --show-labels
NAME             READY   UP-TO-DATE   AVAILABLE   AGE     LABELS
frontend-green   3/3     3            3           9m22s   color=green
redis-master     1/1     1            1           12d     <none>
redis-slave      2/2     2            2           12d     <none>
이제 모두 사라진것을 확인 할 수있다.
방금까지 수작업으로 처리한 프로세스를 Circle CI와 AWS EKS를 통해서 자동화 처리 하도록 하겠다.
자동화를 위한 참고사항
자동화를 위해서 미리 알아야 할 사항 몇가지를 확인 해봐야 한다.
우선 환경 변수를 통해서 yaml의 color가 수정 가능하게 해야한다.
deployment yaml에 환경변수를 선언 할 수 있도록 파일 수정해 준다.
apiVersion: apps/v1 #  for k8s versions before 1.9.0 use apps/v1beta2  and before 1.8.0 use extensions/v1beta1
kind: Deployment
metadata:
  name: frontend-$COLOR
  labels:
    color: $COLOR

spec:
  selector:
    matchLabels:
      app: guestbook
      tier: frontend
      color: $COLOR
  replicas: 3
  template:
    metadata:
      labels:
        app: guestbook
        tier: frontend
        color: $COLOR
    spec:
      containers:
      - name: php-redis
        image: stevenna/guestbook:latest
        resources:
          requests:
            cpu: 100m
            memory: 100Mi
        env:
        - name: GET_HOSTS_FROM
          value: dns
          # If your cluster config does not include a dns service, then to
          # instead access environment variables to find service host
          # info, comment out the 'value: dns' line above, and uncomment the
          # line below:
          # value: env
        ports:
        - containerPort: 80
기존 green이나 blue가 들어가던 영역을
`$COLOR`로 선언하였다.
기본적으로 kubenetes에 yaml에는 환경변수가 중간에 주입되게 되어있지 않다. 그런관계로 kubectl을 실행하기 전에 해당 내용을 수정해 줘야 한다.
ubuntu@master:~/examples$ export COLOR=blue
ubuntu@master:~/examples$ envsubst < frontend-deployment-blue.yaml
apiVersion: apps/v1 #  for k8s versions before 1.9.0 use apps/v1beta2  and before 1.8.0 use extensions/v1beta1
kind: Deployment
metadata:
  name: frontend-blue
  labels:
    color: blue

spec:
  selector:
    matchLabels:
      app: guestbook
      tier: frontend
      color: blue
  replicas: 3
  template:
    metadata:
      labels:
        app: guestbook
        tier: frontend
        color: blue
    spec:
      containers:
      - name: php-redis
        image: stevenna/guestbook:latest
        resources:
          requests:
            cpu: 100m
            memory: 100Mi
        env:
        - name: GET_HOSTS_FROM
          value: dns
          # If your cluster config does not include a dns service, then to
          # instead access environment variables to find service host
          # info, comment out the 'value: dns' line above, and uncomment the
          # line below:
          # value: env
        ports:
        - containerPort: 80
상기내용을 보면 환경변수로 `COLOR`를 선언하고 `envsubst`로 deployment의 내용을 blue로 수정한 내용을 확인 가능하다.
이를 파이프라인화 해서 아래와 같이 실행 명령화 할 수 있다.
export COLOR=blue
envsubst < frontend-deployment.yaml | kubectl apply -f -
현재 Service가 바라보고 있는 pods가 무슨 color인지도 확인할 필요가 있다.
#!/bin/bash

myvalue=$(kubectl describe service frontend | egrep -o -i 'green')

if [[ $myvalue == *"green"* ]];then
        exit 0;
    else
        exit 1;
fi
상기와 같이 script를 확인하면
green이 있을 경우 exit 0으로 정상종료가 될것이고 만약 blue라고 하면 비정상 종료가 될 것이다. 이는 다음과 같은 명령어로 확인 가능하다.
ubuntu@master:~/examples$ echo $?
0
circle ci에서 정상 처리 여부를 flow check하는데 사용할 수 있다.
'Software활용' 카테고리의 다른 글
| Latex (MathJax) Math 수식 입력하기 (0) | 2021.05.02 |
|---|---|
| spring-boot-starter-thymeleaf 수정사항 즉각 반영하기 (0) | 2021.04.28 |
| kubeadm join 실패 (2) | 2021.03.08 |
| Ubuntu에 Python 3.7 Install 하기 (0) | 2021.03.07 |
| kubernetes reset 하기 (0) | 2021.03.07 |
