html의 Web component 사용은 이미 몇년이 지난 이야기이긴 하지만,
정리를 위해서 이곳에 관련 이야기를 담고자 한다.
여기 나오는 내용은 "Getting Started with Components"를 공부하면서 정리한 내용 들이다.
https://www.packtpub.com/product/getting-started-with-web-components/9781838649234
해당 서적의 주요 코드는 다음에 위치해 있다.
https://github.com/PacktPublishing/Getting-Started-with-Web-Components
Custom elements
html tag 자체를 만들고 browser 사용할 수 있도록 만들어 주는 것
1. HTMLElement를 상속하는 class를 만들어 준다.
class HelloWorld extends HTMLElement {
    constructor(){
        super();

        this.innerHTML = "Hello World2"
    }
}
2. 해당 class를 Html tag와 연결해 준다.
customElements.define('hello-world', HelloWorld);3. html에 javascript와 사용하고자 하는 tag를 연결해 준다.
<!DOCTYPE html>
<html lang="en">
<head>
    <meta charset="UTF-8">
    <meta http-equiv="X-UA-Compatible" content="IE=edge">
    <meta name="viewport" content="width=device-width, initial-scale=1.0">
    <title>Document</title>
</head>
<body>

    <hello-world></hello-world>

    <script type='module' src="Helloworld.js"></script>
</body>
</html>
아래와 같이 custom tag가 작동되는 것을 확인 할 수 있다.

Shadow DOM
다른 DOM과의 연결고리를 끊어주는 역할을 한다. DOM을 캡슐화한다.
document의 root를 재 정의 해줌으로써, css까지도 독립적으로 작동하게 된다.
앞선 만든 hello world 페이지를
- document.querySelector('html').getRootNode()
로 보면 아래와 같이 html을 확인 할 수 있다.

child Node를 보면 아래와 같다.

이곳에 <p> tag를 하나 추가하고 shadow root를 붙여보자.
1. html에 tag를 추가한다.
<!DOCTYPE html>
<html lang="en">
<head>
    <meta charset="UTF-8">
    <meta http-equiv="X-UA-Compatible" content="IE=edge">
    <meta name="viewport" content="width=device-width, initial-scale=1.0">
    <title>Document</title>
</head>
<body>

    <hello-world></hello-world>

    <script type='module' src="Helloworld.js"></script>

    <p>

    </p>
</body>
</html>
2.javascript에서 p tag에 shadow root를 만들어서 붙혀준다.
const $shadowRoot = document.querySelector('p');
const shadowRoot   = $shadowRoot.attachShadow({mode: 'open'});
const $span        = document.createElement('span');

$span.innerText = "새로운 root를 붙여보자";

shadowRoot.appendChild($span);
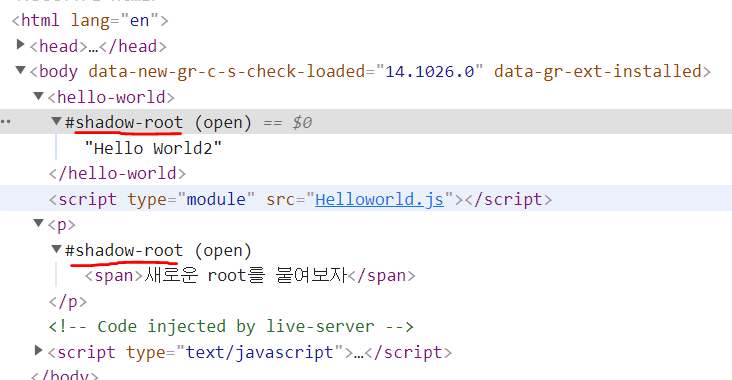
shadow root를 확인할 수 있다.
눈으로 볼수는 있지만 프로그램적으로는 접근 할 수 없다.

p tag의 하위에 아무것도 없는 것을 볼 수 있다.
자세한 내용은 하기 url에서 확인 가능하다.
https://developer.mozilla.org/en-US/docs/Web/API/Element/attachShadow
앞서 hello world를 독립적인 shadow root를 만들어 줄 수도 있다.
class HelloWorld extends HTMLElement {
    constructor(){
        super();

        const shadow = this.attachShadow({mode:'open'});

        shadow.append("Hello World2");
    }
}
web component가 완전히 독립된 것을 확인할 수 있다.
Template
재활용 가능한 DOM structure를 만들어 준다.
html에 template tag를 이용해서 사용할 template를 정의한다.
    <template id="my-template">
        <div class="red-border">
        <p>Hello Templates</p>
        <p>This is a small template</p>
        </div>
    </template>
    <div id="target"></div>
javascript에서 해당 template 정보를 갖어와서 이하 DOM을 목표한 곳에 붙여주자.
const $template = document.querySelector('#my-template');
const contents = $template.content;
document.querySelector('#target').appendChild(contents.cloneNode(true));
해당 코드를 실행해 보면

Template는 눈에 보이지 않고 목표한 target에 DOM이 들어온 것을 확인 할수 있다.
이것을 앞서 만들어놓은 component에 적용해 보자.
class HelloWorld extends HTMLElement {
    constructor(){
        super();
        const $template = document.querySelector('#hello-world-template');
        const contents = $template.content;

        const shadow = this.attachShadow({mode:'open'});

        shadow.append(contents.cloneNode(true));
    }
}
Hello world template가 shadow dom을 통해서 붙여진것을 확인 할 수 있다.
추가적인 코드는 아래에서 확인할 수 있다.
https://github.com/theyoung/webcomponents
2021.08.14 - [Web] - Web Components Callback Methods & lifecycle
Web Components Callback Methods & lifecycle
web component에 대해서는 아래 내용을 먼저 읽고 오자. 2021.08.14 - [Web] - Web component (Custom Elements, Shadow DOM, Template) connectedCallback() component가 DOM에 추가 되면 가장먼저 불리워지는 me..
enumclass.tistory.com
'Web' 카테고리의 다른 글
| Web Component publish 공개 하기 (0) | 2021.08.15 |
|---|---|
| Web Components Callback Methods & lifecycle (0) | 2021.08.14 |
| Gradle's dependency cache may be corrupt (1) | 2021.05.21 |
| webpack basic with webstorm (0) | 2020.03.27 |
| Vue basic with webstorm (0) | 2020.03.27 |
