
Web Components가 무었인지에 대해서는
2021.08.14 - [Web] - Web component (Custom Elements, Shadow DOM, Template)
2021.08.14 - [Web] - Web Components Callback Methods & lifecycle
2021.08.14 - [Web] - Web Component Event Dispatching 하기
이 3개를 반듯이 이해 해야한다.
이것을 이해했다는 전제로 기존에 만들어진 Site를 어떻게 Web components화 하는지에 대해서 글을 쓰고자 한다.
여기있는 소스는 다음 Repository의 Source를 기반으로 했다.
https://github.com/andy-piccalilli/vanilla-js-state-management-boilerplate
2가지 이유때문에 해당 소스를 사용했는데,
- MIT 라이센스로 소스가 공개되었다.
- 최종목표인 State Management에 대한 Article Sample Source이다
https://css-tricks.com/build-a-state-management-system-with-vanilla-javascript/
여러 사이드를 찾아봤지만, 가장 정확하게 나온 State management 설명 사이트라고 생각이 들었다.
여기에서는 State Management를 빼고 기존 Website를 어떻게 Web Components화를 하는지 쓰고자 한다.
참고로 shadow는 사용하지 않았다.
Site 분석
우선 어떻게 구성되어 있는 화면인지 분석을 해보자.

기능적 화면 구성은
3개의 파트로 구성되어 있다.

- 오늘 해야할 TODO의 갯수를 count한다
- TODO 리스트를 보여준다
- TODO 리스트는 추가 될 수있고
- x를 눌러서 삭제 될 수 있다. 삭제 되면 1번 숫자가 내려간다.
- Text Box에 글을 쓸 수 있고 Save 버튼으로 저장하면 2번에 TODO 리스트에 추가되고, 1번 갯수 Count를 추가한다
Html 분석
이제 컴포넌트를 어떻게 구성 할 것인지 Html을 확인해 보자.
    <main>
        <header class="intro">
            <h1 class="intro__heading">Done list</h1>
            <p class="intro__summary">A list of things that you have achieved today</p>
            <p class="intro__summary"><b>Note:</b> The data isn't stored, so it will disappear if you reload!</p>
        </header>
        <section class="app">
            <section class="app__input">
                <h2 class="app__heading">What you've done</h2>
                <div class="js-items" aria-live="polite" aria-label="A list of items you have done"></div>
                <form class="[ new-item ] [ boilerform ] [ js-form ]">
                    <div class="boilerform">
                        <!-- Form styles from the https://boilerform.design boilerplate -->
                        <label for="new-item-field" class="[ new-item__label ] [ c-label ]">Add a new item</label>
                        <input type="text" class="[ new-item__details ] [ c-input-field ]" id="new-item-field" autocomplete="off" />
                        <button class="[ c-button ] [ new-item__button ]">Save</button>
                    </div>
                </form>
            </section>
            <aside class="app__status">
                <p role="status" class="visually-hidden">You have done <span class="js-status">1 thing</span> today!</p>
                <div class="[ app__decor ] [ js-count ]" aria-hidden="true">
                    <small>You've done</small>
                    <span>1</span>
                    <small>things today 😢</small>
                </div>
            </aside>
        </section>
    </main>
html의 구성은 main tag안에 모두 모여있는 것을 확인 할 수있다.
header한개와 section한개 2개의 tag로 크게 나눌 수 있다.
Component화 하기 좋도록 분리가 되어있다.
다시 section을 보면 input section과 status section으로 나누어져 있다.
그림으로 보면 아래와 같다.
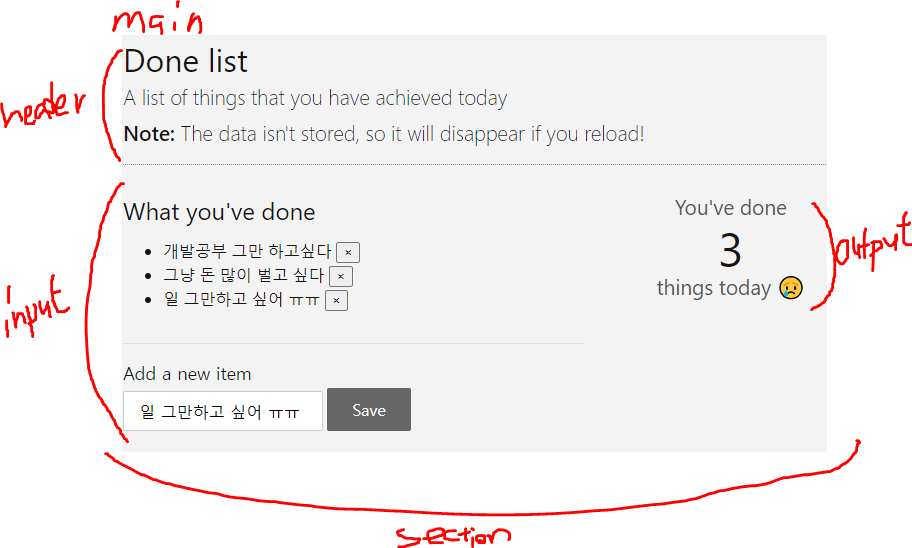
Component를 모두 3개로 나누어서 만드는 것으로 하자.
- main-app : 사이트 전체를 대표하는 tag
- header-intro : header 부분 대표
- app-input : input 영역 대표
- app-status : status section 위에서는 output 여역을 대표한다.
main-app Component
main-app component는 사이트 전체를 대표하는 tag로써 html에 다음과 같이 표시된다.
일단 main-app이 이하로 다른 component는 겉으로 들어나지 않게 된다.
우선 MainApp.js를 만들자
기본 Component구조를 만드는 첫번째 Component이고 이후 다른 컴포넌트는 하기 코드를 copy해서 쓸 예정이다.
export default class MainApp extends HTMLElement {
    constructor(){
        super();
        this.render();
    }

    render(){
        this.innerHTML = this.getTemplate();
    }

    getTemplate(){
        return `
        `;
    }

    connectedCallback(){
    }

    disconnectedCallback(){
    }

    static get observedAttributes(){
        return [];
    }

    attributeChangedCallback(name, oldValue, newValue){
    }
};

customElements.get('main-app')?? customElements.define('main-app',MainApp);
기본 구조는
- constructor : 최초 실행 생성 Method이다
- render() : 해당 tag에 넣을 html tag를 rendering한다
- getTemplate() : rendering될 html tag에 대한 template이다
- connectedCallback() : 해당 컴포넌트가 mount될때 불리어 진다
- disconnectedCallback() : 해당 컴포넌트가 unmount될때 불리어 진다.
- observedAttributes :해당 tag에 attributes를 observing한다
- attributeChangedCallback : attributes가 수정된다면 수정된 갯수 만큼 불리어 진다.
이제 이 구조는 모든 Components가 동일하게 사용될 예정이다.
우선 Template 구조를 잡아보자.
    getTemplate(){
        return `
            <head-intro class="intro"></head-intro>
            <section class="app">
                <app-input class="app__input" ></app-input>
                <app-status class="app__status"></app-status>
            </section>
        `;
    }
뒤이어 만들 Component의 배치를 head-intro와 section안에 2개의 컴포넌트로 구성 하기로 하였다.
혹시 몰라서 마지막 줄에 코드에 대한 설명을 하자면
customElements.get('main-app')?? customElements.define('main-app',MainApp);main-app이라는 tag가 customElements에 있는가? 없다면 새롭게 define해라.
동일 tag로 2번 define하면 오류가 날 수 있음으로, component가 여러차례 사용되면서 define되는 것을 막기위한 용도이다.
head-intro Component
컴포넌트를 아래와 같이 만들어 주자.
export default class HeadIntro extends HTMLElement {
    constructor(){
        super();


        this.render();
    }

    render(){
        this.innerHTML = this.getTemplate();
    }

    getTemplate(){
        return `
            <h1 class="intro__heading">Done list</h1>
            <p class="intro__summary">A list of things that you have achieved today</p>
            <p class="intro__summary"><b>Note:</b> The data isn't stored, so it will disappear if you reload!</p>
        `;
    }

    connectedCallback(){

    }

    disconnectedCallback(){

    }

    static get observedAttributes(){
        return [];
    }

    attributeChangedCallback(name, oldValue, newValue){

    }
};

customElements.get('head-intro')?? customElements.define('head-intro',HeadIntro);
getTemplate에 들어가는 Tag는 원래 html의
        <header class="intro">
            <h1 class="intro__heading">Done list</h1>
            <p class="intro__summary">A list of things that you have achieved today</p>
            <p class="intro__summary"><b>Note:</b> The data isn't stored, so it will disappear if you reload!</p>
        </header>
이 부분을 대체하였다. 이렇게 html을 대체할때 주의해야 할 것이있는데, 바로 class이다.
style-sheet를 한번 확인해 보자.
/**
* Intro
*/
.intro {
    padding: 0 0 1rem 0;
    margin: 0 0 2rem 0;
    border-bottom: 1px dotted var(--border);
}

.intro__heading {
    font-weight: 400;
}

.intro__summary {
    margin-top: 0.3rem;
    font-size: 1.3rem;
    font-weight: 300;
}

.intro__summary b {
    font-weight: 500;
}
위와 같이 tag의 형태와는 상관없이 class 들로만 이루어 진것을 알 수 있다.
이런경우 문제 없이 사용해도 되지만 원래 header가 갖고 있는 css 속성이 없어짐으로 이것은 주의 해야한다.
header는 기본적으로 display:block 속성이 있음으로 해당 부분을 맞추어주자.
/**
* Intro
*/
head-intro {
    display: block;
}

.intro {
    padding: 0 0 1rem 0;
....
header는 개발이 끝났다.

app-status Component
아래와 같이 Component를 만들어 주자.
export default class AppStatus extends HTMLElement {
    constructor(){
        super();
        this.render();
    }

    render(){
        this.innerHTML = this.getTemplate();
    }

    getTemplate(){
        return `
            <aside class="app__status">
            <p role="status" class="visually-hidden">You have done <span class="js-status">1 thing</span> today!</p>
            <div class="[ app__decor ] [ js-count ]" aria-hidden="true">
                <small>You've done</small>
                <span>1</span>
                <small>things today 😢</small>
            </div>
            </aside>
        `;
    }

    connectedCallback(){

    }

    disconnectedCallback(){

    }

    static get observedAttributes(){

    }

    attributeChangedCallback(name, oldValue, newValue){
    }
};

customElements.get('app-status')?? customElements.define('app-status',AppStatus);
Template를 제외한 모든 코드는 이미 설명한것과 동일하다.
Template 역시 앞서 만들어져 있는 html 코드를 붙여넣기 한것으로 끝났다.
일단 AppStatus는 이정도로 만들고 AppInput을 만들고자 한다.
여기 TODO 갯수를 세는 Count의 기능이 빠졌는데 해당 기능은 app-input과 연동하려고 한다. 이후에 설명하겠다.
app-input Component
기본 코드를 만들자.
export default class AppInput extends HTMLElement {
    constructor(){
        super();
        this.render();
    }

    render(){
        this.innerHTML = this.getTemplate();
    }

    getTemplate(){
        return `
            <h2 class="app__heading">What you've done</h2>
            <div class="js-items" aria-live="polite" aria-label="A list of items you have done"></div>
            <form class="[ new-item ] [ boilerform ] [ js-form ]">
                <div class="boilerform">
                    <!-- Form styles from the https://boilerform.design boilerplate -->
                    <label for="new-item-field" class="[ new-item__label ] [ c-label ]">Add a new item</label>
                    <input type="text" class="[ new-item__details ] [ c-input-field ]" id="new-item-field" autocomplete="off" />
                    <button class="[ c-button ] [ new-item__button ]">Save</button>
                </div>
            </form>
        `;
    }

    connectedCallback(){
    }

    addItem(){
    }

    disconnectedCallback(){

    }

    static get observedAttributes(){
        return [];
    }

    attributeChangedCallback(name, oldValue, newValue){

    }
};

customElements.get('app-input')?? customElements.define('app-input',AppInput);
큰 그림은 다를게 없다.
그러나 input 컴포넌트는 data의 입력을 시작하는 중요한 행위를 한다. 해당 행위를 위해서 차례차례 코드를 추가해 나가고자 한다.
TODO 입력하기
Todo를 유지하기 위해서는 해당 data를 유지할 공간이 필요하다.
    constructor(){
        super();
        this.items = new Array();
        this.render();
    }
this.items를 추가했다.
해당 array에 입력을 하는 주체는 html form이 되게 된다.
form이 button을 이용해서 submit이 되게 되면 this.items에 todo 내용을 입력하는 것이다.
    connectedCallback(){
        let that = this;
        this.querySelector('form').addEventListener('submit',(e)=> {
            e.preventDefault();
            that.addItem();
        });
    }
connectedCallback은 DOM mount되는 시점에 실행되는 method로써 이벤트 처리는 이곳에서 일반적으로 등록해 준다.
html에서 form tag를 찾고 submit이라는 event가 불리워 지면 addItem이라고 하는 method를 call하도록 만들어 주자.
여기서 e.preventDefault()를 꼭해주자 안그러면 event bubbling 되어서 화면이 refresh된다.
    addItem(){
        let item = this.querySelector('#new-item-field').value.trim();
        this.items.push(item);
        this.renderList();
    }
실제로 Item 입력이 일어나는 부분에서 todo value를 얻어오자.
let item = this.querySelector('#new-item-field').value.trim();
이제 해당 item을 push해 주고 redering을 해줘야 하는데, 전체 코드 rendering을 할 경우 items list 부분만이 아닌 form영역도 새로 그리게 되어서 문제가 된다. 해당 부분을 해결하기 위해 부분 rendering만 처리하도록
this.renderList();
를 만들어 준다.
    renderList(){
        let that = this;
        this.querySelector('.js-items').innerHTML = `
            <ul>
                ${this.items.map((item,idx)=> `<li> ${item} <button class="rm" aria-label="Delete this item">×</button></li>`).join('')}
            </ul>
        `;
    }
this.items에 map을 이용해서 list item(li) tag를 만들어 주고 해당 Dom을 .js-items 밑에 넣어 줌으로써 TODO 리스트를 표시해 주자.
            <h2 class="app__heading">What you've done</h2>
            <div class="js-items" aria-live="polite" aria-label="A list of items you have done"></div>
            <form class="[ new-item ] [ boilerform ] [ js-form ]">
.js-items는 실제 todo리스트를 표현해 줄 위치이다.
어기까지 개발이 되었다면 todo가 입력이 잘 될 것이다.
TODO 삭제하기
그런데 해당 TODO를 삭제 할 수도 있어야 한다.
앞서 만든 rederList() 에서 x버튼을 누르면 해당 item이 화면에서 지워지는 것이다.
이부분을 위해서 하기와 같이 코드를 보완해 주자.
    renderList(){
        let that = this;
        this.querySelector('.js-items').innerHTML = `
            <ul>
                ${this.items.map((item,idx)=> `<li> ${item} <button class="rm" aria-label="Delete this item">×</button></li>`).join('')}
            </ul>
        `;

        this.querySelectorAll('.rm').forEach((btn,idx)=>{
            btn.addEventListener('click',(e)=>{
                that.items.splice(idx, 1);
                that.renderList();
            });
        });
    }
.rm이라는 button전체를 읽어와서 해당 button에 event를 걸어주는 것이다.
        this.querySelectorAll('.rm').forEach((btn,idx)=>{
            btn.addEventListener('click',(e)=>{
                that.items.splice(idx, 1);
                that.renderList();
            });
        });
click된 index에 해당하는 items를 삭제해 주고 새롭게 renderList()함으로써 해당 기능을 구현할 수 있다.
이제 TODO를 입력도하고 삭제도 할 수 있게 되었다.
이제 남은것은 이 TODO Items의 갯수를 어떻게 app-status에 넣어 줄것이냐? 이다.
Item count dispatch 하기
app-input tag에서 items의 길이가 변경될때 마다, 변경된 상황을 알려주는 방법은 무었이 있을까?
현재 선택 가능한 방법은 event dispatch이다.
일반적으로 onclick이나 onchange같은 event를 특정 tag에 addEventListener를 통해 처리 할 수 있었다는 것을 기억하자. 같은 방법으로 Item 정보를 Dispatch하면 된다.
    dispatchItems(){
        this.dispatchEvent(new CustomEvent('changed',{
            detail : {data : this.items.length},
            bubbles : true
        }));
    }
Item의 사이즈 변화가 일어나면 불리워질 method이다.
dispatchEvent 내장함수를 이용해서 CustomEvent를 발생하면 외부에서는 해당 Event를 명명된 'changed'로 수신 할 수있게 된다.
이부분은 잠시후에 MainApp.js 수정을 통해 설명하고자 한다.
위의 코드를 보면 dispatchItems가 불리어지면, 'changed' 이벤트로 event.detail.data에 items의 길이를 넣어서 보내주는 것을 알 수 있다.
그럼 이 method는 누가 불러야 할까?
바로 todo를 입력하는 시점과 삭제하는 시점이다.
    addItem(){
        let item = this.querySelector('#new-item-field').value.trim();
        this.items.push(item);
        this.dispatchItems();
        this.renderList();
    }
renderList(){
let that = this;
this.querySelector('.js-items').innerHTML = `
<ul>
${this.items.map((item,idx)=> `<li> ${item} <button class="rm" aria-label="Delete this item">×</button></li>`).join('')}
</ul>
`;
this.querySelectorAll('.rm').forEach((btn,idx)=>{
btn.addEventListener('click',(e)=>{
that.items.splice(idx, 1);
that.renderList();
that.dispatchItems();
});
});
}위에 두 Mehtod에 dispatchItems() 를 넣은 것을 확인 할 수있다.
app-input에서 할 수 있는일은 끝이 났다. 필요한 곳에서 해당 데이터를 읽어가면 된다.
Item Count 받아오기
다시 main-app 코드로 돌아가자.
앞서 만든 app-input에 event처리를 위한 코드를 만들어야 한다.
        this.querySelector('app-input').addEventListener('changed',(e)=>{
            console.log(e.detail.data);
        });
addEventListener를 통해서 앞서 정의했던 changed event를 수신함으로써 items가 변경되었다는 것을 알 수 있게 된다. 하지만 main-app에서 해당 count를 사용하지는 않는다.
해당 값을 사용할 app-status에게 어떻게 값을 넘겨줄 것인가?
해당 tag에 대한 instance를 유지하고 있다고 하면 직접 data를 넣어주면 되겠지만, 그냥 tag일 뿐인 app-status와 통신하는 방법은?
tag안에 있는 attribute를 수정해 주는 방법밖에 없다.
예를 들자면 <div count="3"></div> 이런식으로 custom attribute를 주입시켜주는 방법밖에 없다.
        this.querySelector('app-input').addEventListener('changed',(e)=>{
            that.querySelector('app-status').setAttribute('item-count',e.detail.data);
        });
app-status tag에 item-count라고 하는 custom attribute를 주입시켜주는 코드이다.
그럼 이 코드는 어디에 들어가면 될까?
    connectedCallback(){
        let that = this;
        this.querySelector('app-input').addEventListener('changed',(e)=>{
            that.querySelector('app-status').setAttribute('item-count',e.detail.data);
        });
    }
main-app이 DOM에 주입되는 시점에 해당 이벤트를 넣어줌으로써 AppInput의 items가 변화가 발생하면, app-status에 item-count의 attribute가 변경되게 된다.
이제 거의 다 왔다. 해당 값이 변경되는 것은 app-status가 알기만 하면된다.
일단 여기까지 코드가 완료된 main-app은 아래와 같다.
import AppInput from "./components/AppInput.js";
import AppStatus from "./components/AppStatus.js";
import HeadIntro from "./components/HeadIntro.js";


export default class MainApp extends HTMLElement {
    constructor(){
        super();


        this.render();
    }

    render(){
        this.innerHTML = this.getTemplate();
    }

    getTemplate(){
        return `
            <head-intro class="intro"></head-intro>
            <section class="app">
                <app-input class="app__input" ></app-input>
                <app-status class="app__status" item-count='0'></app-status>
            </section>
        `;
    }

    connectedCallback(){
        let that = this;
        this.querySelector('app-input').addEventListener('changed',(e)=>{
            that.querySelector('app-status').setAttribute('item-count',e.detail.data);
        });
    }

    disconnectedCallback(){

    }

    static get observedAttributes(){
        return [];
    }

    attributeChangedCallback(name, oldValue, newValue){

    }
};

customElements.get('main-app')?? customElements.define('main-app',MainApp);
app-status attributes observe 하기
Observer Pattern이라는게 있다.
A와 B가 있을 때 A의 상태가 변화되면 B에서 즉각적으로 그 변화를 알 수있는 방법을 Observer패턴 이라고 한다.
ECMA6에서 Observer에 대한 공식적인 spec시 취소 되었음에도 해당 방법은 현재 MVVM 패턴과 함께 가장 Modernized 된 방식으로 자리잡았다.
(이게 꽤 오래전에 Spec에서 사라지는 것(out)을 확인하고, 이 post 때문에 spec을 확인했는데 역시 Observer라는 명시적인 기능은 Spec에서 확인되지 않았다.)
해당 방법을 구현하기위해서 몽키패칭 및 데코레이션, Scope를 이용한 방법을 많이 사용했었는데, 본 글을 쓰면서 보니 아직도 상황은 비슷한 것으로 보인다.
아무튼 최근에 들어서 attributes의 변화에 대한 Observe가 가능한 방법이 생겼다. 해당 방법이 어제부터 Browser에 포함되었는지는 잘 모르겠다. MDN은 2020년도에 해당 내용을 작성했다. 인터넷 상으로는 2016년도 이후로 관련 내용이 있긴한데 많이 사용되기 시작한건 최근부터 이긴한것 같다.
-> MutationObserver라는 spec이 추가 되었다.
https://developer.mozilla.org/en-US/docs/Web/API/MutationObserver
WebComponent는 Google 주도하에 2016년 부터 Web Component를 주도했다.
아무튼 핵심은 HTMLElement가 attribute의 변화사항을 즉각 알수 있게 되었다는 것이다.
위에서 item-count의 변화사항은 app-status에서 아래와 같이 알수 있게 된다.
    static get observedAttributes(){
        return ['item-count'];
    }

    attributeChangedCallback(name, oldValue, newValue){
        if(name = 'item-count'){
            this.count = newValue;
            this.render();
        }

    }
observedAttributes에 observe하고자 하는 attribute를 return에 정의한다.
attributeChangedCallback은 name에 observe대상의 name과 oldValue, newvalue를 알려줌으로써 즉각적이 값의 변화를 확인 할 수 있다.
이코드를 반영한것이 아래 코드이다.
export default class AppStatus extends HTMLElement {
    constructor(){
        super();
        this.count = this.getAttribute('item-count');

        this.render();
    }

    render(){
        this.innerHTML = this.getTemplate();
    }

    getTemplate(){
        return `
            <aside class="app__status">
            <p role="status" class="visually-hidden">You have done <span class="js-status">1 thing</span> today!</p>
            <div class="[ app__decor ] [ js-count ]" aria-hidden="true">
                <small>You've done</small>
                <span>${this.count}</span>
                <small>things today 😢</small>
            </div>
            </aside>
        `;
    }

    connectedCallback(){

    }

    disconnectedCallback(){

    }

    static get observedAttributes(){
        return ['item-count'];
    }

    attributeChangedCallback(name, oldValue, newValue){
        if(name = 'item-count'){
            this.count = newValue;
            this.render();
        }

    }
};

customElements.get('app-status')?? customElements.define('app-status',AppStatus);
this.count를 attribute item-count와 연동함으로써 변동사항을 즉각적으로 render()에 전달 할 수 있게 되었다.
위의 코드들은 최종적으로 최적화가 필요하다.

위의 그림을 보자면 app-input의 변화사항을 main-app이 relay로 받아서 app-status로 update 한다는 것이다.
website의 depth 복잡도가 높아진다면 이런 방식은 매우 비효율 적이다.
이러한 문제점을 해결하고자 나온것이 MVVM 패턴, state management library이다. 가장 유명한 것이 redux인데, 다음 Post를 통해서 위의 코드에 어떻게 state mangement 기능을 추가 할 수 있는지 알아보자.
위의 코드 까지는
https://github.com/theyoung/webcomponents/tree/webComWithStateManagement/statementforwebcomponent
여기에서 코드를 확인할 수 있다.
branch를 잘못따서 이름이 바뀌었는데... 그 부분은 이해해 주시기를...
이제 State Management를 포함시켜서 서비스를 만들어 보자!
'Web' 카테고리의 다른 글
| Web Component 상태관리 만들기 (Vanillajs) (2) | 2021.08.22 |
|---|---|
| MVC, MVP, MVVM 패턴의 이해 (0) | 2021.08.20 |
| Web Component Event Dispatching 하기 (0) | 2021.08.15 |
| Web Components Slot 사용하기 (0) | 2021.08.15 |
| Web Component publish 공개 하기 (0) | 2021.08.15 |