목표
2022.01.24 - [Android] - Android Fragment 설정하기
위에서 만들어진 Fragment에 Navigation을 이용해서
Activity하나에 3개의 Fragment가 이동하도록 만드는게 목적이다.
Navigation할 Fragment 2개 더 만들기
앞서서 설명한 방법에 따라서 Fragment2개를 더 만들어 보겠다.

위와 같이 2개의 Fragment를 만들었다.
Navigation이 될 순서는
TestFragment -> SecondFragment -> ThirdFragment
이다.
각 Fragments사이의 이동을 하기전에 kt파일을 onCreateView만 남겨놓고 깨끗히 지워 준다.
package com.example.fragmentsetup

import android.os.Bundle
import androidx.fragment.app.Fragment
import android.view.LayoutInflater
import android.view.View
import android.view.ViewGroup


/**
 * A simple [Fragment] subclass.
 * Use the [SecondFragment.newInstance] factory method to
 * create an instance of this fragment.
 */
class SecondFragment : Fragment() {

    override fun onCreateView(
        inflater: LayoutInflater, container: ViewGroup?,
        savedInstanceState: Bundle?
    ): View? {
        // Inflate the layout for this fragment
        return inflater.inflate(R.layout.fragment_second, container, false)
    }

}
package com.example.fragmentsetup
import android.os.Bundle
import androidx.fragment.app.Fragment
import android.view.LayoutInflater
import android.view.View
import android.view.ViewGroup
/**
* A simple [Fragment] subclass.
* Use the [ThirdFragment.newInstance] factory method to
* create an instance of this fragment.
*/
class ThirdFragment : Fragment() {
override fun onCreateView(
inflater: LayoutInflater, container: ViewGroup?,
savedInstanceState: Bundle?
): View? {
// Inflate the layout for this fragment
return inflater.inflate(R.layout.fragment_third, container, false)
}
}
Navigation 만들기
이제 fragment 사이 관계를 정해주는 xml을 만들어 주자.

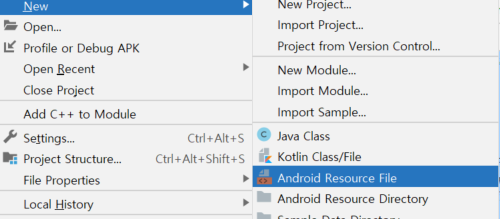
Android Resource File을 선택해서 만들어 준다.

Resource Type을 Navigation으로 선택해 준다.
Navigation을 생성하면 build.gradle에 다음과 같은 dependencies가 생긴다.
    implementation 'androidx.navigation:navigation-fragment-ktx:2.3.5'
    implementation 'androidx.navigation:navigation-ui-ktx:2.3.5'
그리고 Navigation UI 모드를 들어갈 수가 있다.

Navigation 연결하기
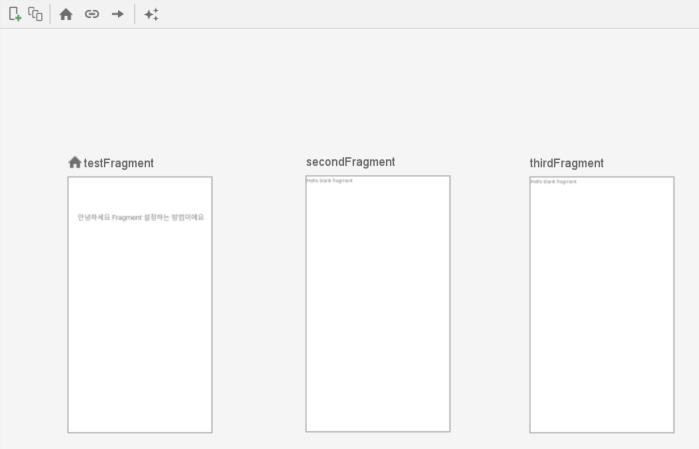
New Destination을 이용해서 3개의 Fragment를 불러온다.


3개의 fragment를 아래 이미지와 같이 화살표로 연결해 준다.

각각의 화살은 action이라고 하는 이름을 갖게 된다.

이 action을 통해서 fragment의 이동을 정의 할 수 있다.
이 navigation_graph.xml을 MainActivity에 연결해 주자.
activity_main.xml에 navigation 연동하기
FragmentContainerView는 Fragment를 지정할 수 있지만, 이와 동시에 navigation을 지정할 수도 있다.
<?xml version="1.0" encoding="utf-8"?>
<androidx.constraintlayout.widget.ConstraintLayout xmlns:android="http://schemas.android.com/apk/res/android"
    xmlns:app="http://schemas.android.com/apk/res-auto"
    xmlns:tools="http://schemas.android.com/tools"
    android:layout_width="match_parent"
    android:layout_height="match_parent"
    android:padding="24dp"
    tools:context=".MainActivity">

    <androidx.fragment.app.FragmentContainerView
        android:id="@+id/fragment_Container_View"
        android:name="com.example.fragmentsetup.TestFragment"
        android:layout_width="match_parent"
        android:layout_height="match_parent"
        android:layout_marginStart="24dp"
        android:layout_marginTop="24dp"
        android:layout_marginEnd="24dp"
        android:layout_marginBottom="24dp"
        app:layout_constraintBottom_toBottomOf="parent"
        app:layout_constraintEnd_toEndOf="parent"
        app:layout_constraintStart_toStartOf="parent"
        app:layout_constraintTop_toTopOf="parent"
        tools:layout="@layout/fragment_test">

    </androidx.fragment.app.FragmentContainerView>
</androidx.constraintlayout.widget.ConstraintLayout>
위는 fragment_test만 화면에 보이게 하는 xml이었다. 이곳에 navigation을 넣어보자.
<?xml version="1.0" encoding="utf-8"?>
<androidx.constraintlayout.widget.ConstraintLayout xmlns:android="http://schemas.android.com/apk/res/android"
    xmlns:app="http://schemas.android.com/apk/res-auto"
    xmlns:tools="http://schemas.android.com/tools"
    android:layout_width="match_parent"
    android:layout_height="match_parent"
    android:padding="24dp"
    tools:context=".MainActivity">

    <androidx.fragment.app.FragmentContainerView
        android:id="@+id/fragment_Container_View"
        android:name="androidx.navigation.fragment.NavHostFragment"
        android:layout_width="match_parent"
        android:layout_height="match_parent"
        android:layout_marginStart="24dp"
        android:layout_marginTop="24dp"
        android:layout_marginEnd="24dp"
        android:layout_marginBottom="24dp"
        app:layout_constraintBottom_toBottomOf="parent"
        app:layout_constraintEnd_toEndOf="parent"
        app:layout_constraintStart_toStartOf="parent"
        app:layout_constraintTop_toTopOf="parent"
        app:navGraph="@navigation/navigation_graph"
        app:defaultNavHost="true"
        >

    </androidx.fragment.app.FragmentContainerView>
</androidx.constraintlayout.widget.ConstraintLayout>
다른 점은 다음과 같다.
android:name="androidx.navigation.fragment.NavHostFragment"안드로이드 name의 class path는 NavHostFragment로 대표된다.
그리고 navGraph와 defaultNavHost를 true로 설정해 준다.
app:navGraph="@navigation/navigation_graph"
app:defaultNavHost="true"
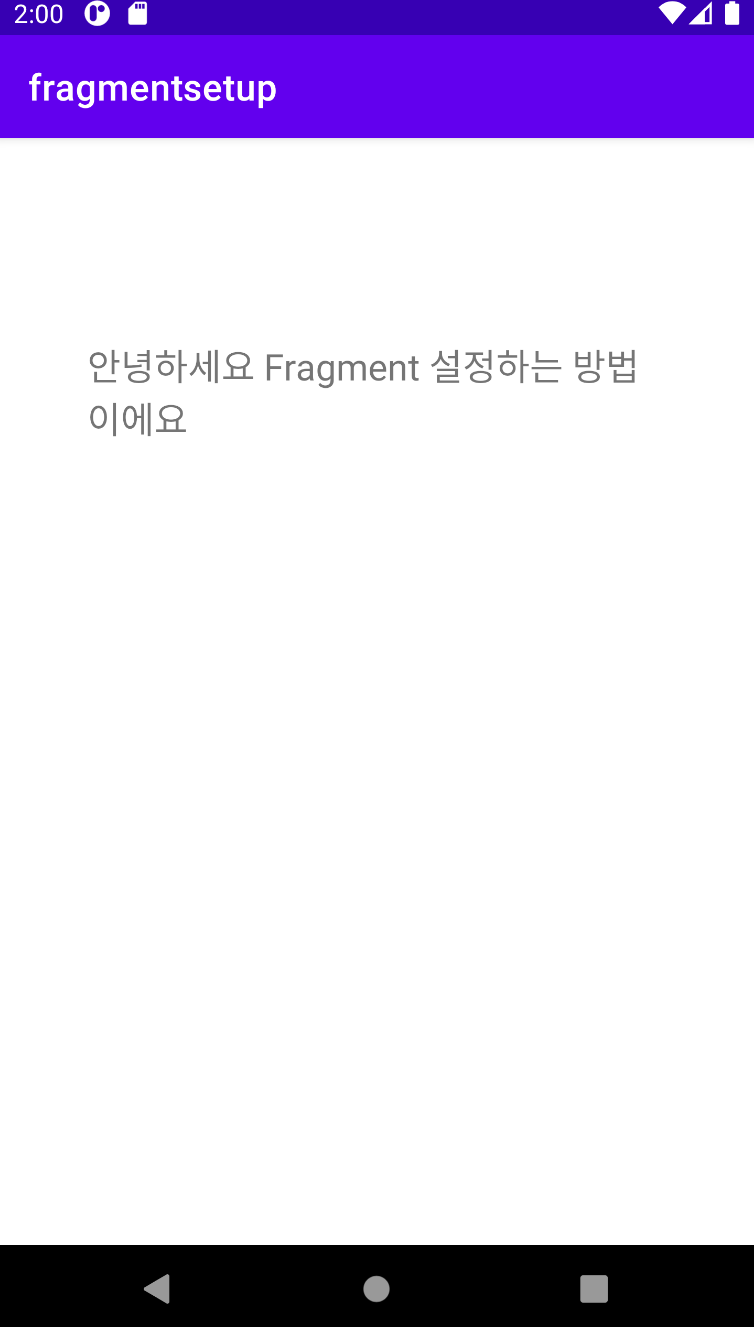
위까지 반영한 결과는 아래와 같다.

첫번째 fragment는 정상 출력이 되는데, 다음 fragment로 이동할 방법이 없다. 이를 해결하기위해서 버튼을 추가해 주자.
버튼 추가 및 Action 연결

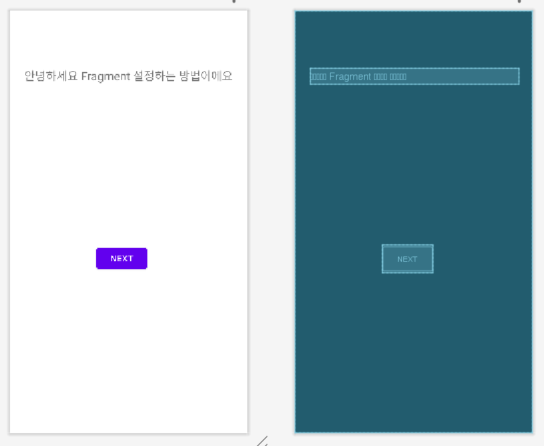
fragment_test.xml에 위와 같이 Next 버튼을 위치 시키자.
<?xml version="1.0" encoding="utf-8"?>
<androidx.constraintlayout.widget.ConstraintLayout
    xmlns:android="http://schemas.android.com/apk/res/android"
    xmlns:app="http://schemas.android.com/apk/res-auto"
    xmlns:tools="http://schemas.android.com/tools"
    android:layout_width="match_parent"
    android:layout_height="match_parent"
    tools:context=".TestFragment">


    <TextView
        android:id="@+id/textView"
        android:layout_width="wrap_content"
        android:layout_height="wrap_content"
        android:text="안녕하세요 Fragment 설정하는 방법이에요"
        android:textSize="20sp"
        app:layout_constraintBottom_toBottomOf="parent"
        app:layout_constraintEnd_toEndOf="parent"
        app:layout_constraintStart_toStartOf="parent"
        app:layout_constraintTop_toTopOf="parent"
        app:layout_constraintVertical_bias="0.13999999" />

    <Button
        android:id="@+id/button"
        android:layout_width="wrap_content"
        android:layout_height="wrap_content"
        android:text="Next"
        app:layout_constraintBottom_toBottomOf="parent"
        app:layout_constraintEnd_toEndOf="parent"
        app:layout_constraintStart_toStartOf="parent"
        app:layout_constraintTop_toBottomOf="@+id/textView" />
</androidx.constraintlayout.widget.ConstraintLayout>
같은 방법으로 fragment_second와 fragment_third에도 넣어주자.
<?xml version="1.0" encoding="utf-8"?>
<androidx.constraintlayout.widget.ConstraintLayout xmlns:android="http://schemas.android.com/apk/res/android"
    xmlns:app="http://schemas.android.com/apk/res-auto"
    xmlns:tools="http://schemas.android.com/tools"
    android:layout_width="match_parent"
    android:layout_height="match_parent"
    tools:context=".SecondFragment">

    <!-- TODO: Update blank fragment layout -->
    <TextView
        android:id="@+id/textView2"
        android:layout_width="match_parent"
        android:layout_height="match_parent"
        android:text="@string/hello_blank_fragment" />

    <Button
        android:id="@+id/button2"
        android:layout_width="wrap_content"
        android:layout_height="wrap_content"
        android:text="Next"
        app:layout_constraintBottom_toBottomOf="@+id/textView2"
        app:layout_constraintEnd_toEndOf="parent"
        app:layout_constraintStart_toStartOf="@+id/textView2"
        app:layout_constraintTop_toTopOf="@+id/textView2" />

</androidx.constraintlayout.widget.ConstraintLayout>
<?xml version="1.0" encoding="utf-8"?>
<androidx.constraintlayout.widget.ConstraintLayout xmlns:android="http://schemas.android.com/apk/res/android"
    xmlns:app="http://schemas.android.com/apk/res-auto"
    xmlns:tools="http://schemas.android.com/tools"
    android:layout_width="match_parent"
    android:layout_height="match_parent"
    tools:context=".ThirdFragment">

    <!-- TODO: Update blank fragment layout -->
    <TextView
        android:id="@+id/textView3"
        android:layout_width="match_parent"
        android:layout_height="match_parent"
        android:text="@string/hello_blank_fragment" />

    <Button
        android:id="@+id/button3"
        android:layout_width="wrap_content"
        android:layout_height="wrap_content"
        android:text="First"
        app:layout_constraintBottom_toBottomOf="@+id/textView3"
        app:layout_constraintEnd_toEndOf="@+id/textView3"
        app:layout_constraintStart_toStartOf="@+id/textView3"
        app:layout_constraintTop_toTopOf="@+id/textView3" />

</androidx.constraintlayout.widget.ConstraintLayout>
이제 layout에 button을 다 넣었다.
button을 누르면 fragment_second로 이동을하고 button2를 누르면 fragment_third로 이동하고 button3을 누르면 move back을 하도록 하겠다.
TestFragment.kt로 이동을 해서 다음과 같이 수정해 준다.
package com.example.fragmentsetup

import android.os.Bundle
import androidx.fragment.app.Fragment
import android.view.LayoutInflater
import android.view.View
import android.view.ViewGroup
import android.widget.Button
import androidx.navigation.findNavController


/**
 * A simple [Fragment] subclass.
 * Use the [TestFragment.newInstance] factory method to
 * create an instance of this fragment.
 */
class TestFragment : Fragment() {

    override fun onCreateView(
        inflater: LayoutInflater, container: ViewGroup?,
        savedInstanceState: Bundle?
    ): View? {
        // Inflate the layout for this fragment
        val view = inflater.inflate(R.layout.fragment_test, container, false)
        view.findViewById<Button>(R.id.button).setOnClickListener {
                view.findNavController().navigate(R.id.action_testFragment_to_secondFragment)
        }
        return view
    }

}
내용은 다음과 같다.
val view = inflater.inflate(R.layout.fragment_test, container, false)fragment는 activity와는 다르다 그래서 내장함수인 findViewById등의 기능을 직접적으로 사용할 수 없다. 이를 해결하기 위해서 해당 fragment를 사용하는 곳의 root view를 얻어와야 하는데, 위의 방법으로 view를 얻어올 수있다.
view.findViewById<Button>(R.id.button).setOnClickListener {
}
얻어온 rootview에서 button id로 Button View를 획득하고 해당 버튼이 클릭되면 불리워질 listener를 등록해 준다.
view.findNavController().navigate(R.id.action_testFragment_to_secondFragment)Navigation은 스스로 욺직일 수 없다. 해당 욺직임은 Navigation Controller를 통해서 가능한데,
위는 Nav Controller를 root view에서 얻어온 후 action Id를 바탕으로 navigation하는 방법이다.
위와 같은 코드로 SecondFragment도 만들어 주자.
package com.example.fragmentsetup

import android.os.Bundle
import androidx.fragment.app.Fragment
import android.view.LayoutInflater
import android.view.View
import android.view.ViewGroup
import android.widget.Button
import androidx.navigation.findNavController


/**
 * A simple [Fragment] subclass.
 * Use the [SecondFragment.newInstance] factory method to
 * create an instance of this fragment.
 */
class SecondFragment : Fragment() {

    override fun onCreateView(
        inflater: LayoutInflater, container: ViewGroup?,
        savedInstanceState: Bundle?
    ): View? {
        // Inflate the layout for this fragment
        val view = inflater.inflate(R.layout.fragment_second, container, false)
        view.findViewById<Button>(R.id.button2).setOnClickListener {
            view.findNavController().navigate(R.id.action_secondFragment_to_thirdFragment)
        }
        return view
    }

}
아래와 같이 잘 이동하는 것을 확인 할 수있다.


뒤로가기
그런데 위의 ThirdFragment의 버튼은 뒤로 갈 곳이 없다.
그래서 First버튼을 누르면, 가장처음 fragment로 이동하게 하고 싶다.
이를 위해서 ThirdFragment에 다음과 같이 코드를 수정하였다.
package com.example.fragmentsetup

import android.os.Bundle
import androidx.fragment.app.Fragment
import android.view.LayoutInflater
import android.view.View
import android.view.ViewGroup
import android.widget.Button
import androidx.navigation.findNavController


/**
 * A simple [Fragment] subclass.
 * Use the [ThirdFragment.newInstance] factory method to
 * create an instance of this fragment.
 */
class ThirdFragment : Fragment() {
    override fun onCreateView(
        inflater: LayoutInflater, container: ViewGroup?,
        savedInstanceState: Bundle?
    ): View? {
        // Inflate the layout for this fragment
        val view = inflater.inflate(R.layout.fragment_third, container, false)
        view.findViewById<Button>(R.id.button3).setOnClickListener {
            view.findNavController().popBackStack()
        }
        return view

    }

}
다른 파일과 다른점이 있다면,
view.findNavController().popBackStack()이 부분이다.
Activity와 동일하게 Fragment도 stack에 history를 쌓는 방식으로 화면을 이동한다.
위와 같이 뒤로가기 처리를 할 경우 ThirdFragment의 직전에 있던 SecondFragment가 나타나게 된다.
이 부분을 해결하기위해서 navigation_graph.xml을 수정하자.
<?xml version="1.0" encoding="utf-8"?>
<navigation xmlns:android="http://schemas.android.com/apk/res/android"
    xmlns:app="http://schemas.android.com/apk/res-auto"
    xmlns:tools="http://schemas.android.com/tools"
    android:id="@+id/navigation_graph"
    app:startDestination="@id/testFragment">

    <fragment
        android:id="@+id/testFragment"
        android:name="com.example.fragmentsetup.TestFragment"
        android:label="fragment_test"
        tools:layout="@layout/fragment_test" >
        <action
            android:id="@+id/action_testFragment_to_secondFragment"
            app:destination="@id/secondFragment"

            />
    </fragment>
    <fragment
        android:id="@+id/secondFragment"
        android:name="com.example.fragmentsetup.SecondFragment"
        android:label="fragment_second"
        tools:layout="@layout/fragment_second"
        >
        <action
            app:popUpTo="@id/testFragment"
            android:id="@+id/action_secondFragment_to_thirdFragment"
            app:destination="@id/thirdFragment" />
    </fragment>
    <fragment
        android:id="@+id/thirdFragment"
        android:name="com.example.fragmentsetup.ThirdFragment"
        android:label="fragment_third"
        tools:layout="@layout/fragment_third" />
</navigation>
달라진 코드는
        <action
            app:popUpTo="@id/testFragment"
            android:id="@+id/action_secondFragment_to_thirdFragment"
            app:destination="@id/thirdFragment" />
이 부분이다.
action_secondFragment_to_thirdFragment가 실행 되면
app:popUpTo="@id/testFragment"testFragment가 나타낼때까지 stack을 삭제하라는 의미이다.
이렇게 수정하고 나면

Third화면에서 First 버튼을 눌렀을때

첫화면으로 잘 돌아가는 것을 확인 할 수 있다.
https://github.com/theyoung/fragmentsetup/tree/e69cba09cb7d10ca54192f62f9e28c3e228087dc
이제 Action에 파라메터를 넣어보겠습니다.
2022.01.25 - [Android] - Android Fragment with Arguments
'Android' 카테고리의 다른 글
| Android View Binding (뷰 바인딩) (0) | 2022.02.03 |
|---|---|
| Android Fragment with Arguments (0) | 2022.01.25 |
| Android Fragment 설정하기 (0) | 2022.01.24 |
| Android CTS/GTS UnofficialApisUsageTest 비 인터페이스 제한 대응 (0) | 2021.08.24 |
| Android Device Default Value 변경 (AOSP Setting) (0) | 2021.07.02 |
