목표
Navigation을 이용한 Fragment의 이동시 Arguments를 전달한다.
2022.01.24 - [Android] - Android Fragment 설정하기
2022.01.24 - [Android] - Android Fragment Navigation with Action
위의 두개까지 완료 했다면 이제는 어떻게 Fragment사이 Action과 함께 Arguments를 넘길 수 있는지 알아 보고자 한다.
build.gradle에 plugin 등록
Arguments의 전달을 위해서는 컴파일시 build 되는 파일이 필요하다.
이를 위해서는 2개의 등록이 필요한데
우선 Top Level build.gradle을 열어보자.
// Top-level build file where you can add configuration options common to all sub-projects/modules.
buildscript {
    repositories {
        google()
        mavenCentral()
    }
    dependencies {
        classpath "com.android.tools.build:gradle:7.0.4"
        classpath "org.jetbrains.kotlin:kotlin-gradle-plugin:1.5.20"

        // NOTE: Do not place your application dependencies here; they belong
        // in the individual module build.gradle files
        def nav_version = "2.3.5"
        classpath "androidx.navigation:navigation-safe-args-gradle-plugin:$nav_version"
    }
}

task clean(type: Delete) {
    delete rootProject.buildDir
}
위와 같이
        def nav_version = "2.3.5"
        classpath "androidx.navigation:navigation-safe-args-gradle-plugin:$nav_version"
이 부분을 넣고 gradle sync를 진행해 주자.
gradle sync가 완료 되었다면 이후에 app build.gradle로 이동해서
plugins {
    id 'com.android.application'
    id 'kotlin-android'
    id 'androidx.navigation.safeargs.kotlin'
}
plug in 위치에
id 'androidx.navigation.safeargs.kotlin'위의 내용을 추가해 줘야 한다.
https://developer.android.com/jetpack/androidx/releases/navigation
상기 플러그인에 대한 버전 정보는 위의 링크를 참조하자.
이후에 꼭! 반듯이! gradle sync를 한번더 해주자.
Navigation에 Argument 추가하기
앞서 만들어 놓은 navigation_graph.xml을 열어주자.

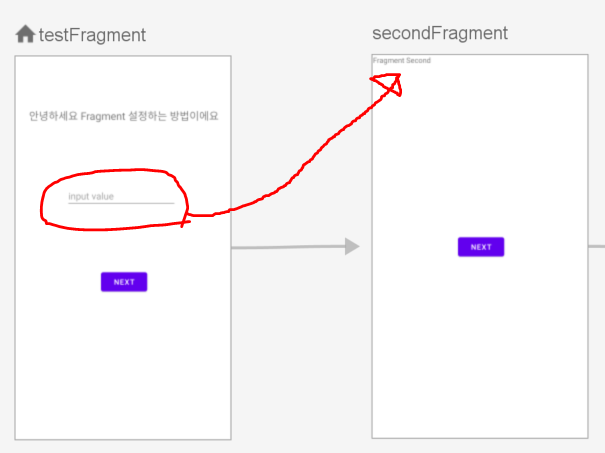
위에서 보는것 처럼 testFragment에서 input value를 넣어주고 Next 버튼을 누르면 해당 value가 secondFragment에 넘겨주도록 설정을 진행할 예정이다.
여기서 중요한것은 파라메터를 누가 받을 것인가이다.
여기서는 secondFragment가 해당 값을 얻을 것이다.
그래서 secondFragment에 argument를 하나 추가해줄 것이다.

secondFragment를 클릭하고 우측에 arguments에 '+'를 클릭하고 String 타입에 seValue라고 하는 변수명을 정의해 주자.
여기까지 하고 저장을 해주자.

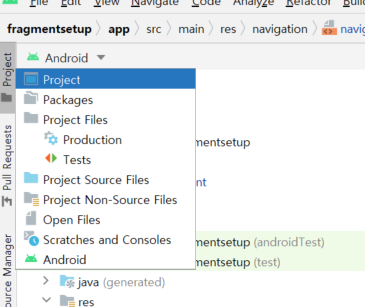
저장완료 후에 프로젝트 Perspective를 Project로 변환해 줘야 한다.
그 이유는 아래와 같이 Class 파일이 Generated되었는지 확인해야하기 때문이다.
다시 말하지만 navigation arg는 compile time에 빌드되는 방식이다.

만약위와 같이 파일이 생성되지 않았다면, IDE상 'Build > Clean 프로젝트' 이후 'Rebuild Project'를 진행해 주자.
파일이 모두 3개가 만들어졌는데, Arguments를 보낼 TestFragment의 방향 즉 Directions, 그리고 수신하는 방향의 secondFragmentDirections, 마지막으로 SecondFragment의 Arguments를 정의한 파일 하나이다.
String Passing
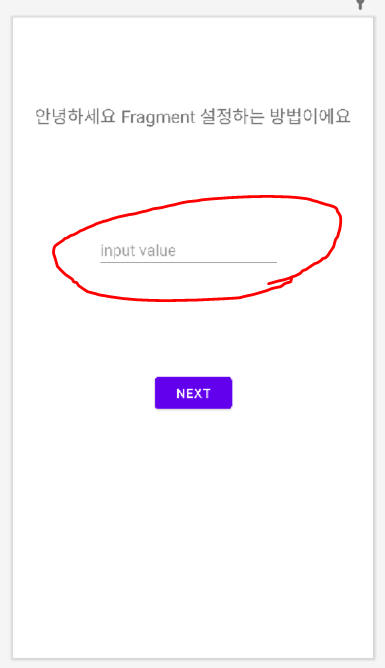
이제 사용자의 입력을 받기 위해 fragment_test를 수정해주자.

Text Edit하나를 추가해 준다. xml은 아래와 같다.
<?xml version="1.0" encoding="utf-8"?>
<androidx.constraintlayout.widget.ConstraintLayout
    xmlns:android="http://schemas.android.com/apk/res/android"
    xmlns:app="http://schemas.android.com/apk/res-auto"
    xmlns:tools="http://schemas.android.com/tools"
    android:layout_width="match_parent"
    android:layout_height="match_parent"
    tools:context=".TestFragment">


    <TextView
        android:id="@+id/textView"
        android:layout_width="wrap_content"
        android:layout_height="wrap_content"
        android:text="안녕하세요 Fragment 설정하는 방법이에요"
        android:textSize="20sp"
        app:layout_constraintBottom_toBottomOf="parent"
        app:layout_constraintEnd_toEndOf="parent"
        app:layout_constraintStart_toStartOf="parent"
        app:layout_constraintTop_toTopOf="parent"
        app:layout_constraintVertical_bias="0.13999999" />

    <Button
        android:id="@+id/button"
        android:layout_width="wrap_content"
        android:layout_height="wrap_content"
        android:text="Next"
        app:layout_constraintBottom_toBottomOf="parent"
        app:layout_constraintEnd_toEndOf="parent"
        app:layout_constraintStart_toStartOf="parent"
        app:layout_constraintTop_toBottomOf="@+id/textView" />

    <EditText
        android:id="@+id/editTextTextPersonName"
        android:layout_width="wrap_content"
        android:layout_height="wrap_content"
        android:ems="10"
        android:hint="input value"
        android:inputType="textPersonName"
        app:layout_constraintBottom_toTopOf="@+id/button"
        app:layout_constraintTop_toBottomOf="@+id/textView"
        tools:layout_editor_absoluteX="96dp" />
</androidx.constraintlayout.widget.ConstraintLayout>
editText의 id는 아래와 같다.
editTextTextPersonName이제 TextFragment.kt를 수정할 차례이다.
package com.example.fragmentsetup

import android.os.Bundle
import androidx.fragment.app.Fragment
import android.view.LayoutInflater
import android.view.View
import android.view.ViewGroup
import android.widget.Button
import android.widget.EditText
import androidx.navigation.findNavController


/**
 * A simple [Fragment] subclass.
 * Use the [TestFragment.newInstance] factory method to
 * create an instance of this fragment.
 */
class TestFragment : Fragment() {

    override fun onCreateView(
        inflater: LayoutInflater, container: ViewGroup?,
        savedInstanceState: Bundle?
    ): View? {
        // Inflate the layout for this fragment
        val view = inflater.inflate(R.layout.fragment_test, container, false)
        view.findViewById<Button>(R.id.button).setOnClickListener {
            val str = view.findViewById<EditText>(R.id.editTextTextPersonName).text.toString() ?: "hello"
            val action = TestFragmentDirections.actionTestFragmentToSecondFragment(str)
            view.findNavController().navigate(action)
        }
        return view
    }

}
수정한 곳은 모두 3개의 라인인데
            val str = view.findViewById<EditText>(R.id.editTextTextPersonName).text.toString() ?: "hello"
            val action = TestFragmentDirections.actionTestFragmentToSecondFragment(str)
            view.findNavController().navigate(action)
editTextTextPersonName에서 사용자 입력 string을 얻어온다.
해당 값을 앞서 Compile time에 generated된 TestFragmentDirections에 action 메서드인 TestFragmentToSecondFragment를 통해서 파라메터를 넣고 action을 만들어 준다.
해당 action을 NavController를 통해서 실행 시켜주는 순서이다.
이제 TestFragment의 Directions를 통해서 파라메터는 SecondFragment에 넘어갔다.
이제 받아보자. SecondFragment.kt를 열어주자.
package com.example.fragmentsetup

import android.os.Bundle
import androidx.fragment.app.Fragment
import android.view.LayoutInflater
import android.view.View
import android.view.ViewGroup
import android.widget.Button
import android.widget.TextView
import androidx.navigation.findNavController


/**
 * A simple [Fragment] subclass.
 * Use the [SecondFragment.newInstance] factory method to
 * create an instance of this fragment.
 */
class SecondFragment : Fragment() {

    override fun onCreateView(
        inflater: LayoutInflater, container: ViewGroup?,
        savedInstanceState: Bundle?
    ): View? {
        // Inflate the layout for this fragment
        val view = inflater.inflate(R.layout.fragment_second, container, false)
        view.findViewById<Button>(R.id.button2).setOnClickListener {
            view.findNavController().navigate(R.id.action_secondFragment_to_thirdFragment)
        }
        view.findViewById<TextView>(R.id.textView2).text = SecondFragmentArgs.fromBundle(requireArguments()).seValue

        return view
    }

}
위에서 달라진 코드는
view.findViewById<TextView>(R.id.textView2).text = SecondFragmentArgs.fromBundle(requireArguments()).seValue이거 한 라인이다.
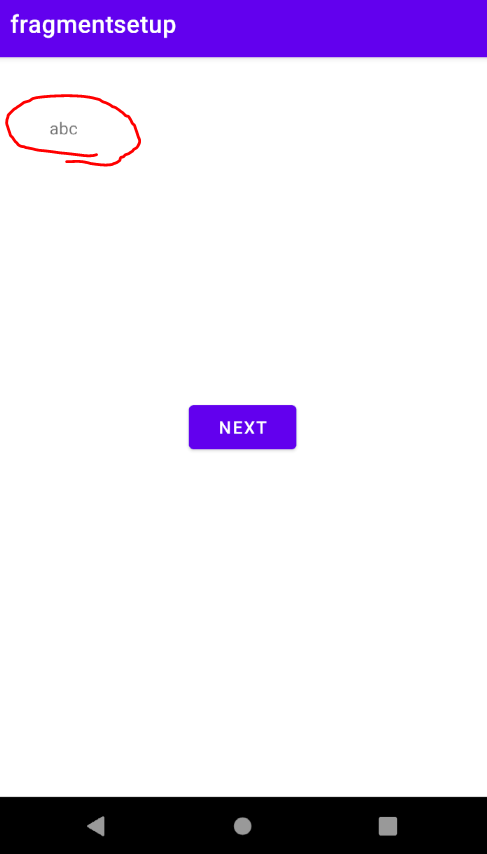
SecondFragment로 넘어온 Arguments에서 번들을 얻어오고 해당 번들에 있는 id 값인 seValue를 갖어와서 textView2의 영역에 해당 값을 표시해주면 끝이난다.
이제 프로그램을 실행해 보면 아래와 같이 Arguments가 잘 넘어가는 것을 볼수 있다.


https://github.com/theyoung/fragmentsetup/tree/2de0436018dde923c210601237c121df6909aa4c
GitHub - theyoung/fragmentsetup
Contribute to theyoung/fragmentsetup development by creating an account on GitHub.
github.com
이제 View Binding 하는 방법을 배워 보겠습니다.
2022.02.03 - [Android] - Android View Binding (뷰 바인딩)
'Android' 카테고리의 다른 글
| Android ViewModel & ListView 사용하기 (0) | 2022.02.05 |
|---|---|
| Android View Binding (뷰 바인딩) (0) | 2022.02.03 |
| Android Fragment Navigation with Action (0) | 2022.01.24 |
| Android Fragment 설정하기 (0) | 2022.01.24 |
| Android CTS/GTS UnofficialApisUsageTest 비 인터페이스 제한 대응 (0) | 2021.08.24 |
